
This little Beetroot Bunches pattern was made from photographs that I took of the cross section of a beetroot and of them in bunches...much like the title suggest. Beetroot are one of my favourite go to veg for juicing, roasting, in salads and in deserts. I love to hear the groans when I tell students that we will be making beetroot brownies; listening to the protestations of how much they are hated and eventually listening to the surprised exclamations of surprise that they are actually enjoying them in brownie form. They really do increase the moistness of cakes and brownies whilst providing healthy sugars. You can see my Beetroot Brownie recipe and post for more details.
Cold Process Soap Making
I've been teaching a six-week Soap Making Course at Wentworth Children's Centre and for weeks 4 and 5 we have been learning the cold press (CP) technique. We could have easily spent the whole six weeks on the CP technique but since part of the course has been family learning and we involved the children of the families there in the activities where it was appropriate for them to do so.

CP equipment (pic from @Wentworth_CC)
We had been building up to this session and this was our most technical as well as creative which explains our scales, goggles and gloves. For the first of the CP technique weeks we used the following recipe which I calculated using the fabulous SoapCalc.net:
150g distilled water (or filtered water, then boiled and cooled)
60g lye
160g olive oil
160g coconut oil
40g almond oil
40g castor oil
10 g lavender essential oil

Blending the oils and lye mixes

Achieving trace
The saponified soap poured into moulds

The soaps after 1 week

Soaps from week 2 with yellow and green dyes
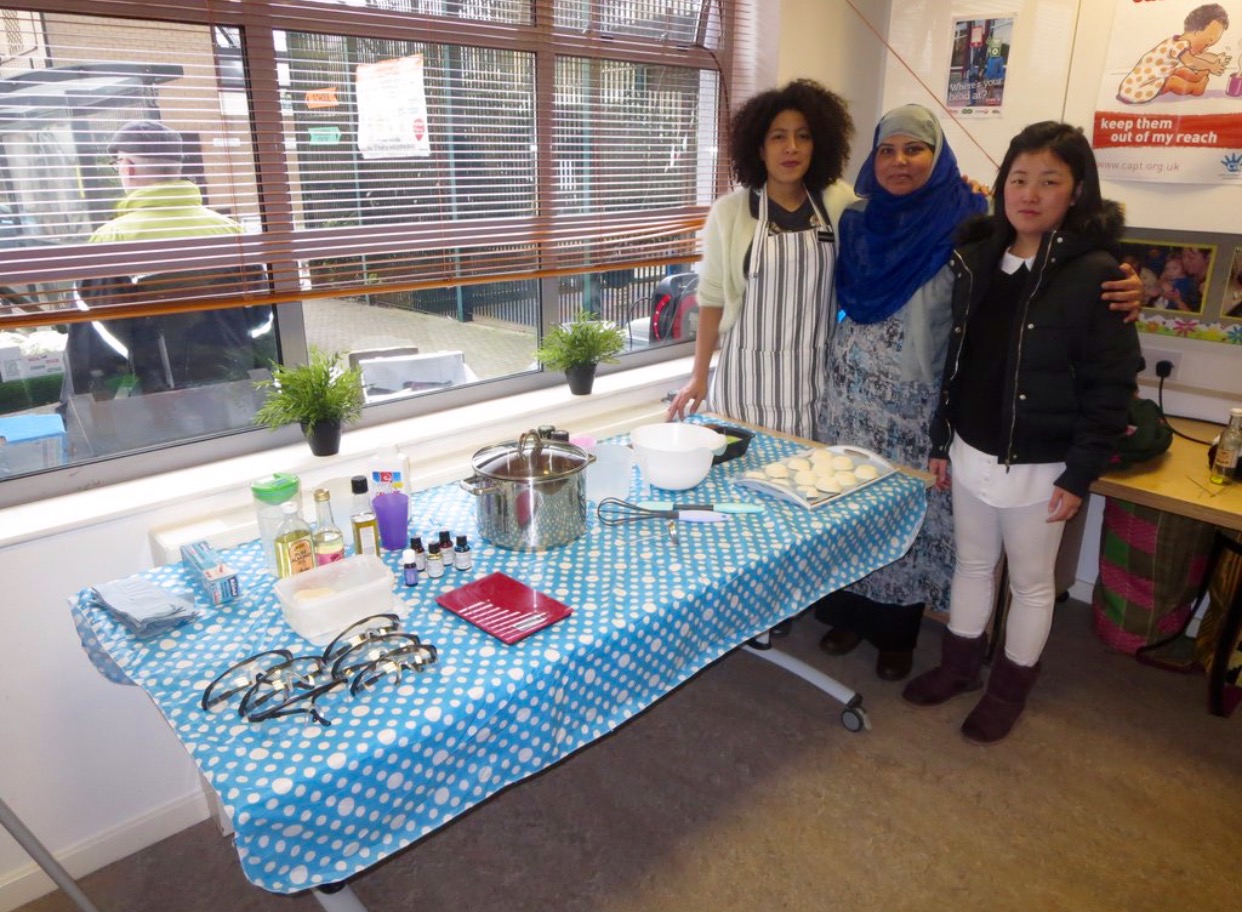
me with some of our group from the class (pic from @Wentworth_CC)
Patterns of 2016 - week 5

Spiggles

Minty

Garden Cell

Barrel of Monkeys
Here are the patterns and prints that I made in week 5 of 2016 which are comprised of polymer clay cane segments which have been made and designed by myself. I then scan them and create a pattern and prints from the cane slices. Find more images on Smy Goodness Instagram.
Turkish Food - Wk 5 - Healthy Eating Fast Food/Takeaway Options
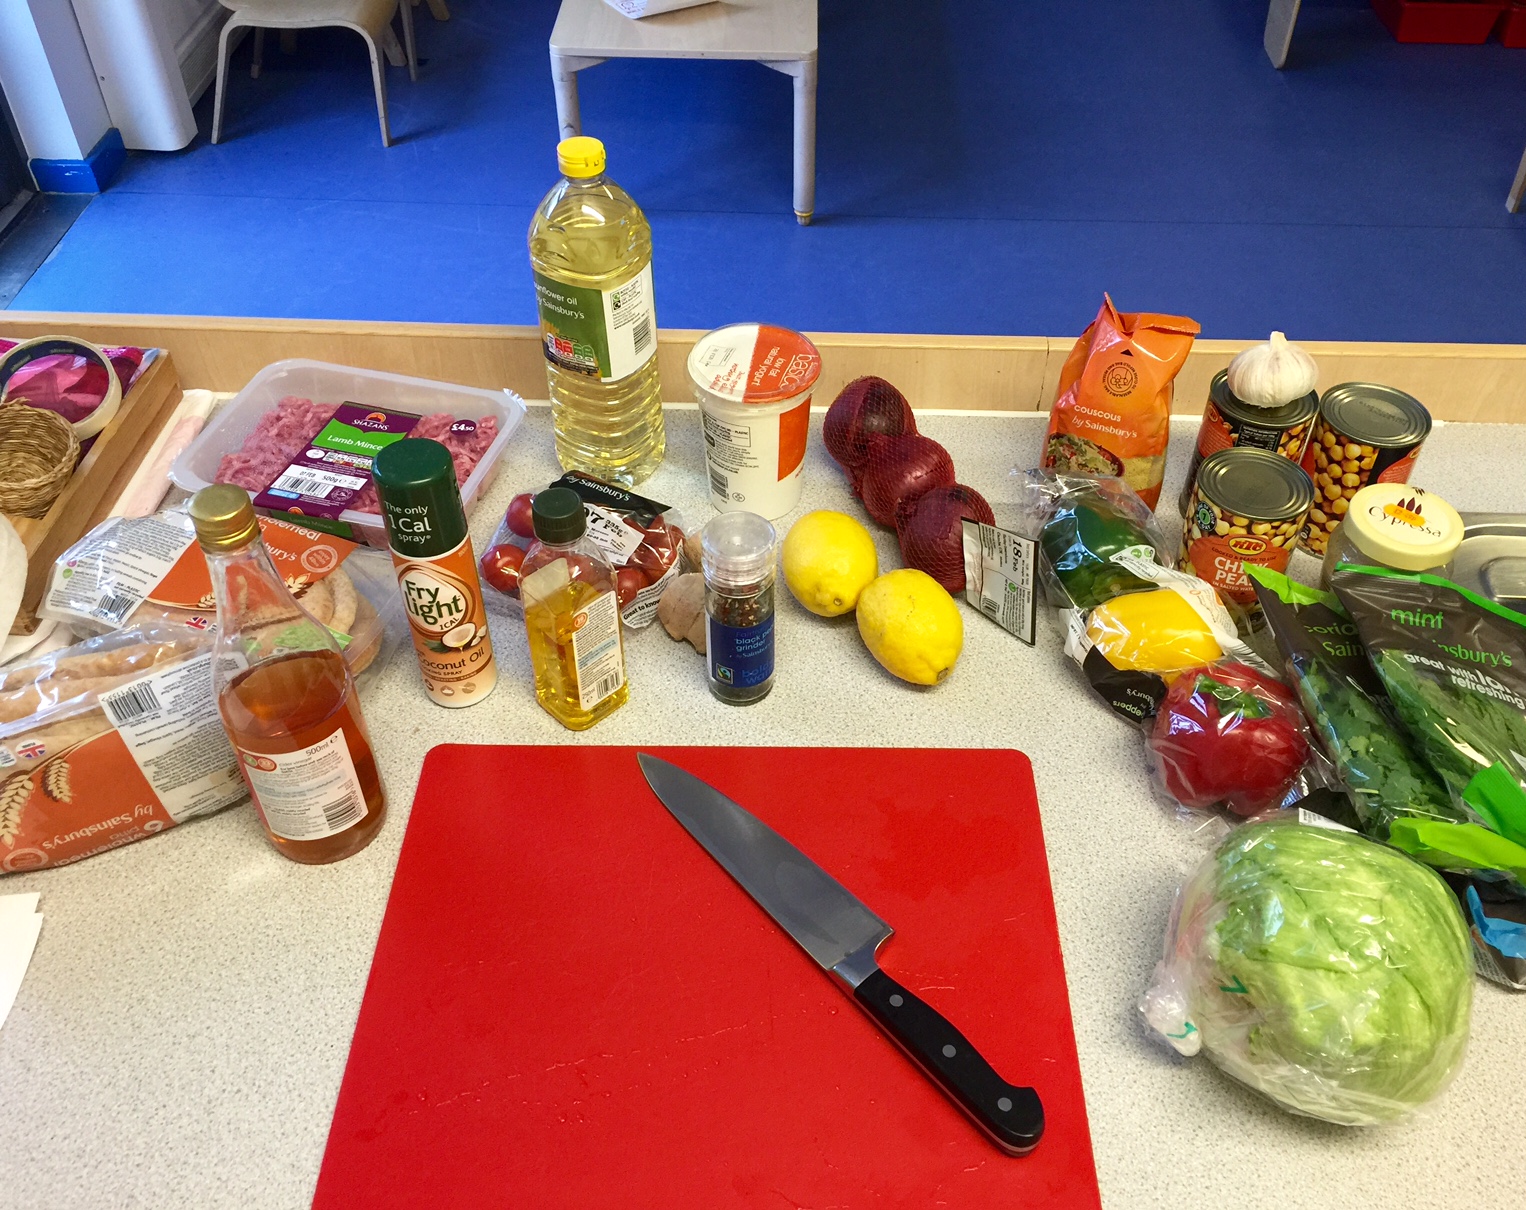
ingredients for the Turkish feast
For week 5 of the Healthy Eating Fast Food Alternatives course we prepared a Turkish feast at Sebright Children's Centre. Each time I run this course the fifth week's menu is chosen by the students. Turkish food is very healthy and very varied but like any food eaten at restaurants it can be full of extra calories and fat. A special thanks is due to Selma who is Turkish and works at Sebright and another very kind Turkish woman who attended the course with her daughters. Together they helped us tweak the recipes and gave us lots of tips. Selma noted that Turkish food often involves a lot of preparation and different stages so we chose these recipes that can be prepared in advance, are cost effective and served with healthy sauces and sides. Selma and Itidal and all the staff at Sebright have been so helpful to myself and the families on the course and they make working at Sebright such a pleasure and I am very thankful for their hard work and support.
For our feast we prepared falafel, lamb kofte, hummous, vegetable cous cous, salad and a homemade mint dressing served with pita bread for 8 adults and 5 children for £15 in two hours.

resting uncooked falafel

cooked falafel
Falafel Recipe
400g can chickpea, rinsed and drained
Half a red onion, finely chopped
garlic clove, chopped
handful of fresh parsley
handful of fresh coriander
2 tbsp breadcrumbs
1 tsp paprika
1 tsp ground cumin
1 tsp ground coriander
1⁄2 tsp chilli powder
2 tbsp plain flour
2 tbsp canola oil or coconut oil
toasted pitta bread
lettuce, tomato and various accompaniments as desired
Falafel Instructions
- Rinse the chickpeas and soak them in water and lightly rub the chickpeas with your finger and thumb to remove the shell surrounding each chickpea and then discard shells.
- Blend all the ingredients until they are a smooth consistency. Cover with plastic wrap and allow the mixture to rest for 20-45 minutes, if not longer.
- Heat up your oil to medium hot but be careful to not burn the oil.
- Shape the mixture into golf sized ball shapes and gently flatten a bit using wet hands so that the mixture does not stick to your hands. Place the balls ready to fry on a plate.
- Fry the falafel balls until they go a deep brown in colour, turn carefully and cook the other side. When they are ready remove and place on a sheet of kitchen towel for a few moments to soap up any excess oil.
- Serve in pita bread or on their own with tomato, lettuce, hummus and other dips and gerkhins, pickled cabbage or other accompaniments.
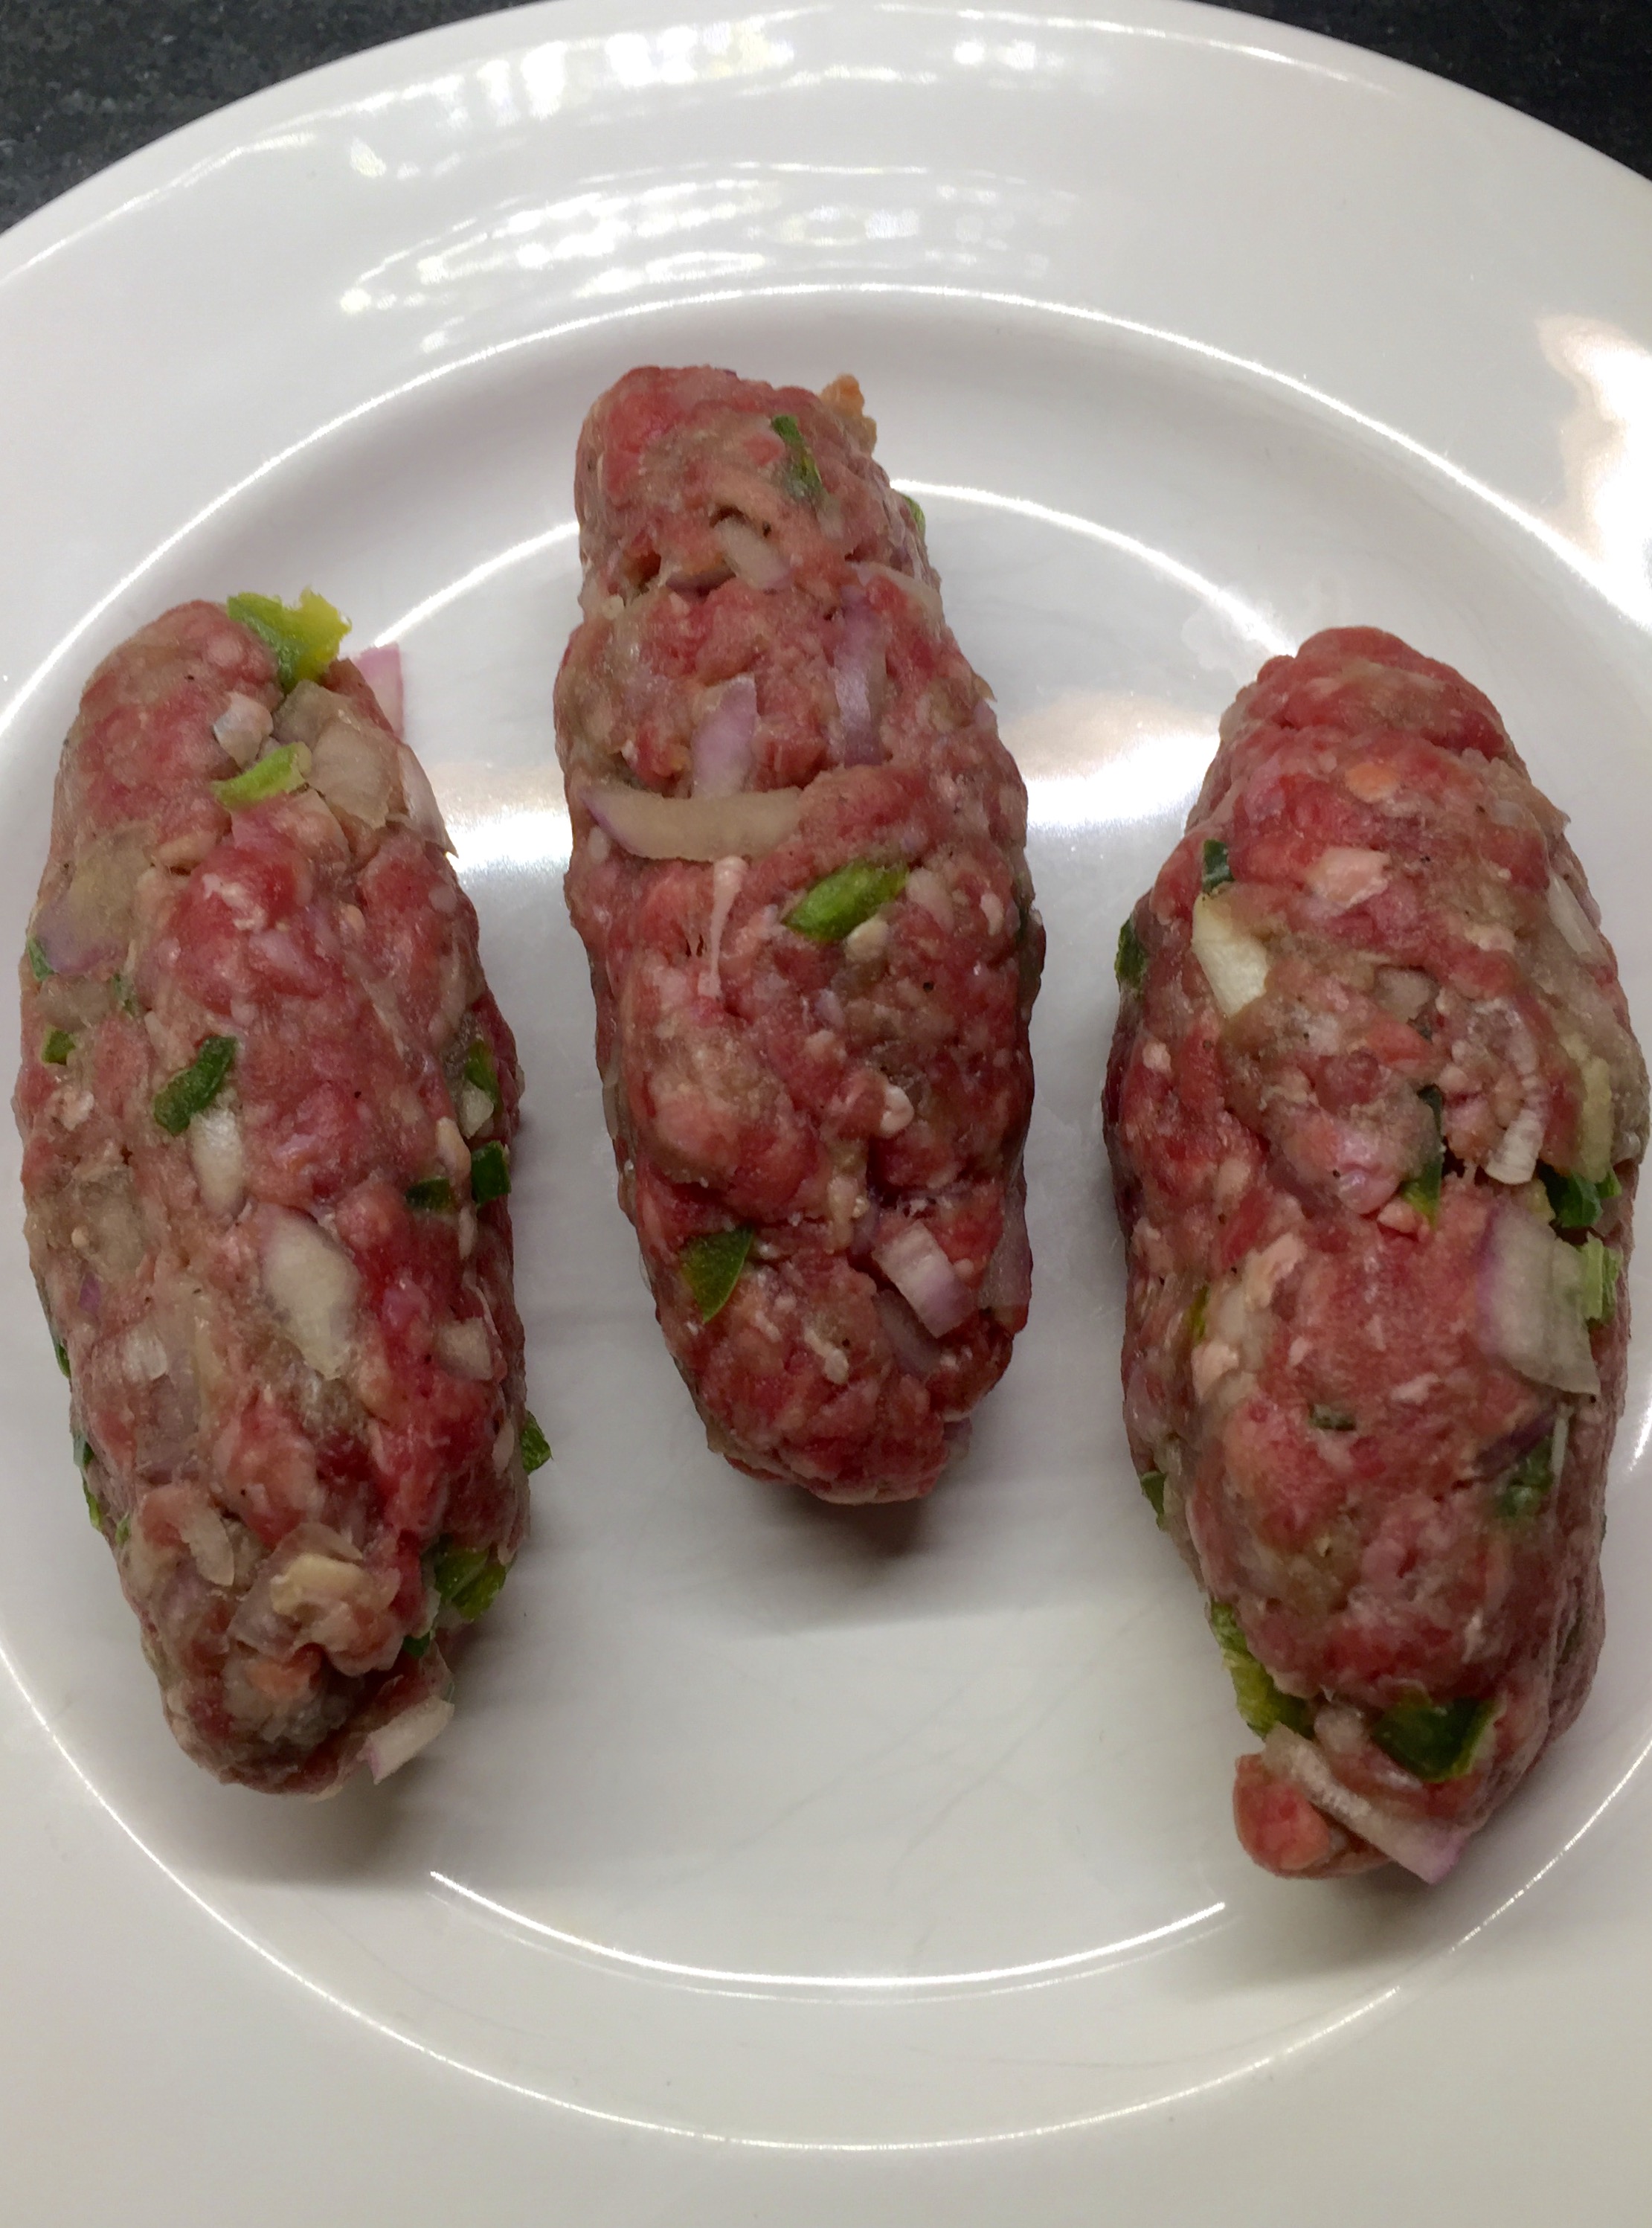
uncooked kofte
grilled kofte
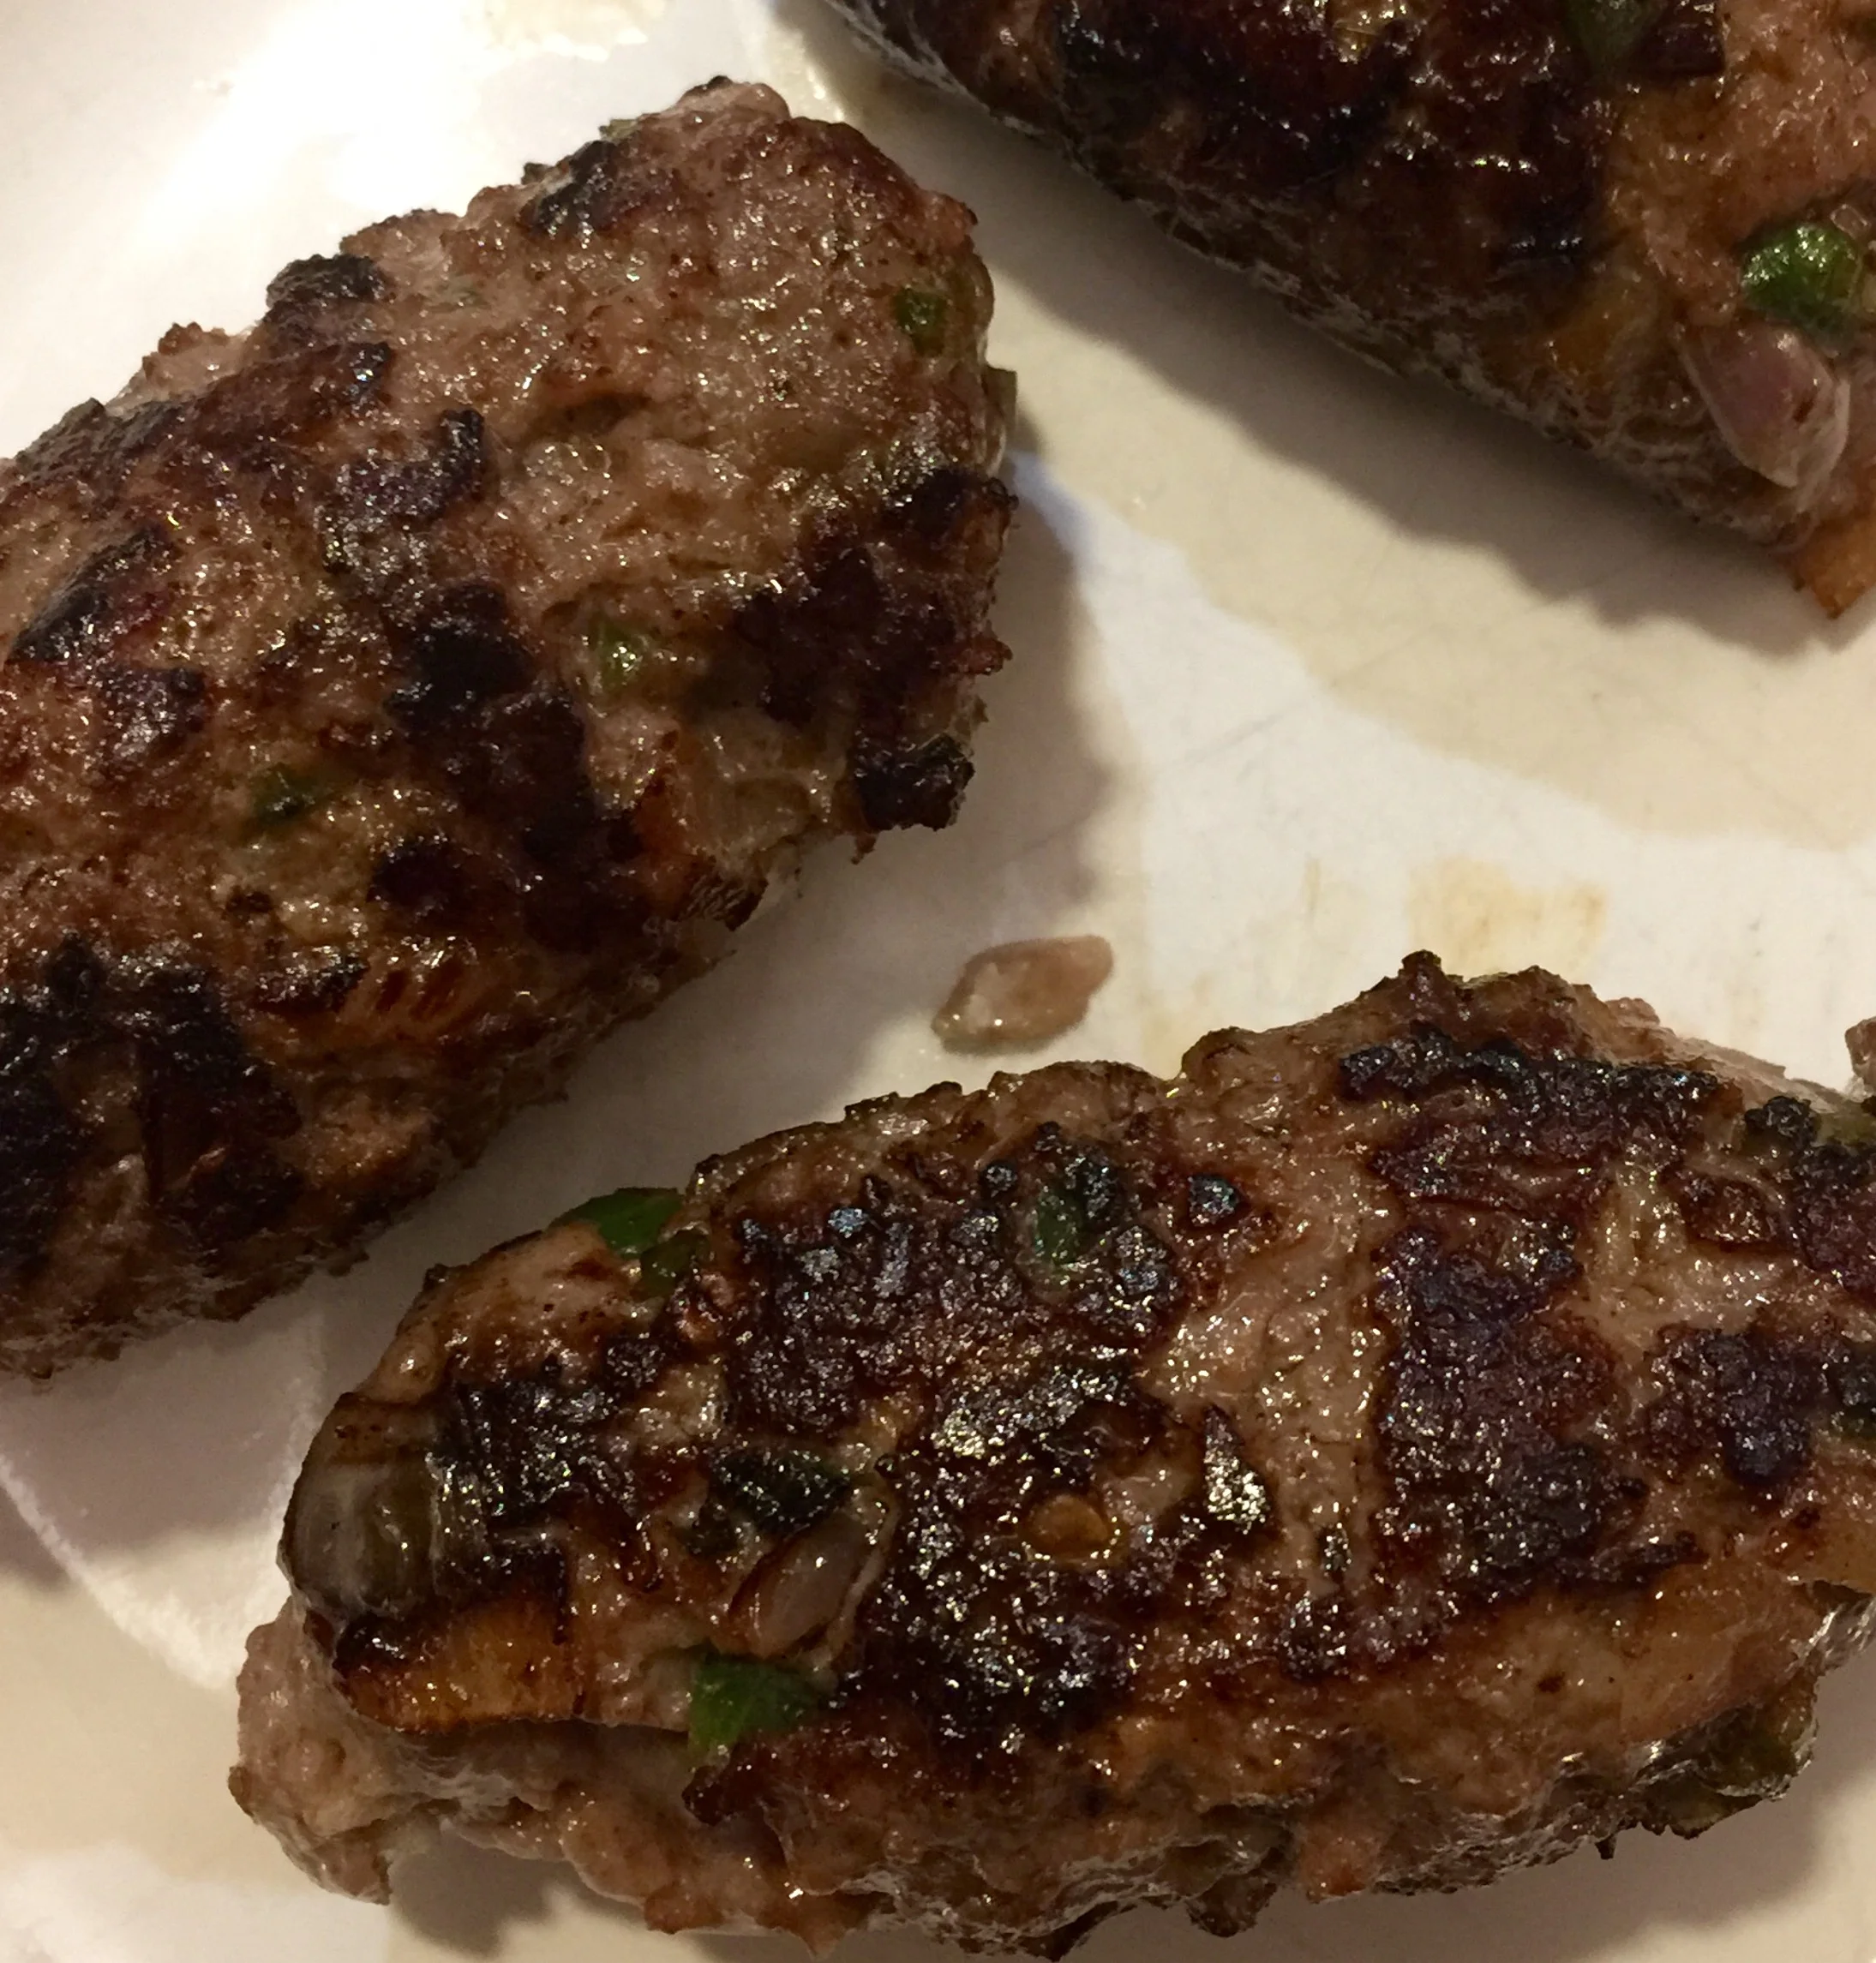
Lamb Kofte Recipe
Ingredients
1 garlic clove, crushed
2 tbsp chopped mint
500g lean lamb mince
1 small red onion finely chopped
1/4 green pepper, cored, deseeded and finely chopped
salt and freshly ground black pepper
Lamb Kofte Instructions
- Mix together the garlic and mint in a bowl, add the lamb and stir well. Cover and leave to marinate in a cool place or the fridge for 10 minutes.
- Shape the mixture into 5 cm long sausage shapes or 3 cm wide round disc shapes and leave to rest covered in a cool place or fridge for 10 minutes.
- Preheat the grill to a hot setting.
- Place the shaped lamb kofte in a single layer on a baking tray and place on the top shelf and cook for 10 minutes, after 10 minutes turn each kofte and cook for another 10 minutes being sure to not burn. Alternatively you can grill the kofte as well for 4-5 minutes on each side until cooked through.
- Serve with mint dressing, cous cous, salad, hummous,e tc.

homemade humous
Hummous Recipe
Ingredients
Two tins (425 grams) chickpeas
Fresh lemon juice, about 1 large lemon
60ml tahini
3 tablespoons olive oil, plus more for serving
1 garlic clove, pressed or finely minced
2 to 3 tablespoons water
1/2 to 1 teaspoon salt, depending on taste
1/2 teaspoon ground cumin
Dash of ground paprika for serving if desired
A sprig of fresh coriander for serving if desired
Hummous Instructions
- Open the tin of chickpeas, drain the liquid and then rinse well with water. Soak the chickpeas in some water and using your fingers and thumb to lightly rub the chickpeas which will release the shells from the chickpea. When all the shells are removed strain the water and keep the chickpeas to the side for the moment.
- In a separate bowl or blender add tahini, lemon juice and the olive oil to a bowl or blender and mix until thoroughly combined. Make sure to scrape the sides down into the mixture and blend/mix again.
- Add the garlic, cumin and salt to the mixture and blend for one minute. Make sure to scrape the sides down into the mixture and blend until thoroughly combined.
- Add the chickpeas in stages to the mixture and blend until combined. Keep blending until the humous is thick and smooth.
- Taste the humous and add any more ingredients until it is of a desired taste and consistency. If the mixture is still not a smooth enough consistency you can add another tablespoon of olive oil or water and then blend again for 1 minute.
- Place the humous into a decorative serving bowl or plate and then garnish with a tablespoon of olive oil, sprinkle with paprika and garnish with a sprig of coriander.
Homemade hummous will last for one week in an airtight container in the fridge.
You can add all sorts of things to hummous to jazz it up, for example roasted garlic, roasted red peppers, chillies and more. You can also use any sort of pulses such as butter beans to make a slightly different type of dip.
If you like a very smooth consistency of hummous you can remove the shells before adding it to the mixture.
For an even more inexpensive hummous you can use dried chickpeas which are cheaper. For this you should soak the chickpeas in water overnight and then cook gently for an hour the next day until soft.

tasty side salad

vegetable cous cous
Vegetable Cous Cous Recipe
Ingredients
500g cous cous
500g organic vegetable stock or one free of MSG or additives
100g tomato diced small
half a red pepper diced small
half a green pepper diced small
half a yellow pepper diced small
handful of fresh parsley
pinch of salt
pinch of freshly cracked pepper
Vegetable Cous Cous Instructions
- Place the couscous in a heatproof bowl, pour 500ml/18fl oz of vegetable stock over the couscous. Leave to stand until the liquid has been absorbed. Season with salt and pepper and fluff the couscous with a fork. Set aside until all the liquid is absorbed, about 15-20 minutes.
- Add all the remaining ingredient and stir until combined. Any diced vegetables can be added to make a tasty cous cous salad.
- Transfer to a serving bowl and garnish with some larger slices of vegetables like peppers or tomatoes and serve.
Basic Mint Dressing
Ingredients
one bunch of mint
1/4 tsp fine sea salt
4 tbsp boiling water
4 tbsp cider vinegar
1 level tbsp sugar or agave syrup
Basic Mint Dressing Instructions
- Separate the stems from the mint leaves and discard the stems.
- Gently rub the salt into the mint leaves sprinkle and chop into roughly .5-1 cm pieces.
- Add the leaves to a heatproof bowl then stir in the sugar or agave syrup.
- Top the mint with the freshly boiled water while stirring thoroughly and then leave to cool.
- Once the mixture is cool, stir in the cider vinegar.
- Add more water or vinegar and adjust seasoning to suit your taste.
The dressing can be added to vegetables, salads, meat and fish.

sitting down to enjoy our meal
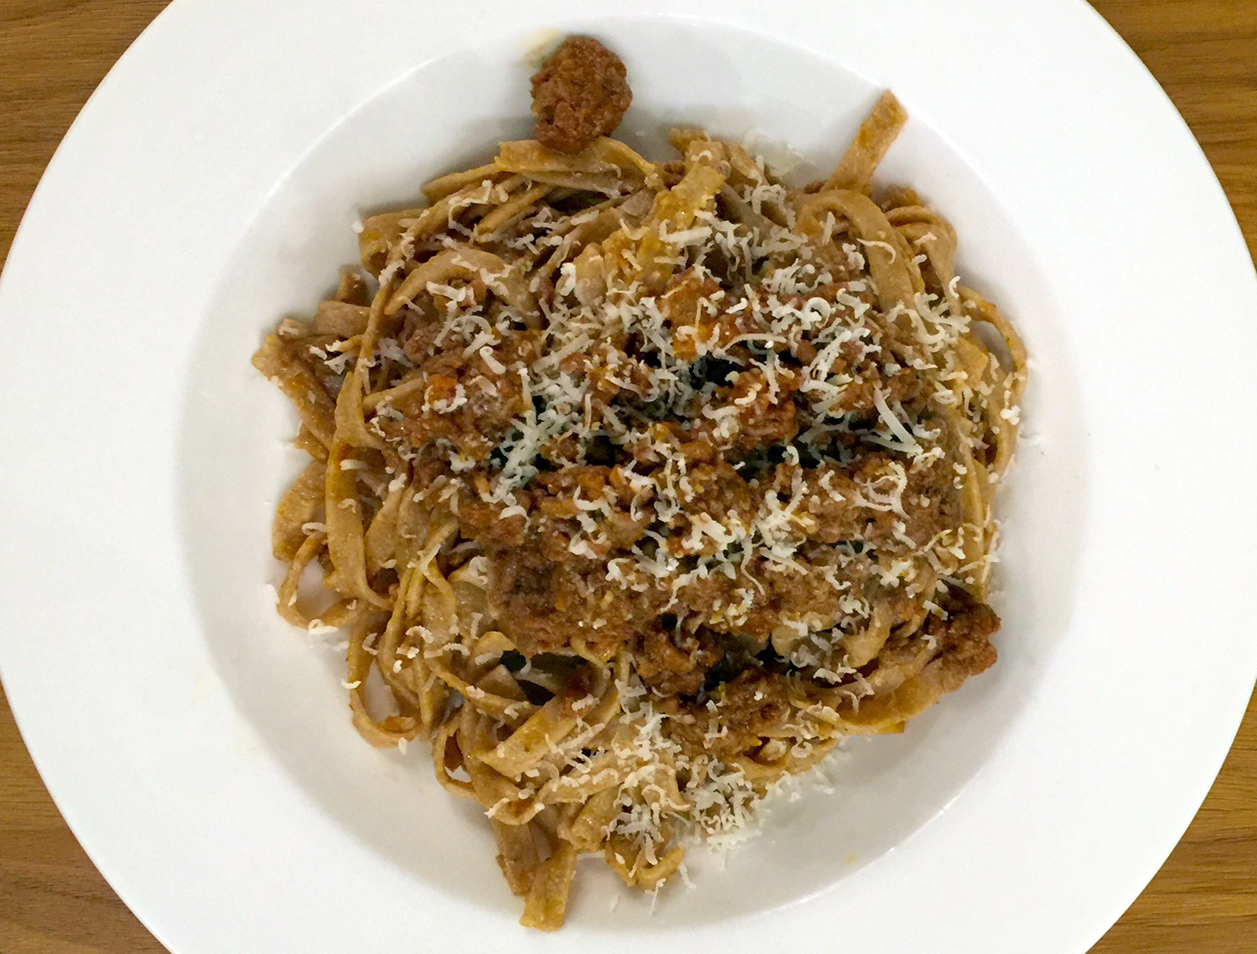
Homemade Spelt Pasta, Proper Ragu and Podcasts

imperia lusso pasta maker
I found this Imperia Lusso pasta maker in a charity shop for £6 and immediately bought it. I have made pasta before with a pasta machine I bought fifteen years ago but I ended up using it only for work with polymer clay so when I saw this Imperia I was excited to get back into the pasta making game.
I am addicted to podcasts and one of my favourite EVER podcasts is Ronna and Beverly, two outspoken fiftysomethings from Boston, who can be seen regularly at the Upright Citizens Brigade Theatre in LA, dispense their unique brand of relationship advice while interviewing/interrogating celebrity guests. This podcast is hilarious and I particularly love lots of their little reference and phrases as I spent a large chunk of my life in Plymouth, Massachusetts. They are also huge anglophiles and even had a series on Sky and perform in London lots and I only hope they come back here soon. They are always great company and were especially so during the making of my ragu and pasta.

prepping the dough

the dough at rest
I love spelt flour for bread making and pasta as well. The photo above shows two eggs which Imperia suggests adding to 250g of flour but I opted to add a third egg to help bind the spelt flour which I believe was the right decision. I broke the eggs into the middle of a flour bowl and used a fork to blend and mix the flour into the middle until it was blended and then gave it a light kneading, covered it and left it to rest for an hour.

pasta rolled out into sheets

from pasta sheets to tagliatelle
I removed a golf ball sized of dough from the rested dough and then divided the rest into three separate balls. I took the golf ball sized ball and flattened it roughly and passed it through the pasta maker several times to remove any bits of dried dough from within. This was after giving the machine a very thorough cleaning with kitchen towel and olive oil. With each of the three balls I roughly flattened it into a rectangular shape, dusted it with a little bit of flour and started with the widest setting and sent it through. I repeated these steps and decreased the width on the machine stopping at the second to thinnest setting. I then let the long sheets as seen above left to rest for 15 minutes and then I sprinkled them with flour and passed them through the tagilatelle setting and let them dry for about an hour.
I brought a big pan of very salted water to the boil and cooked the tagliatelle for 3 minutes. After checking that it was ready I drained and added 3 large serving spoons of my homemade ragu (ragu post coming soon) and mixed this into the pasta. Then I plated up the pasta and added 2 serving spoons of ragu on top of the pasta and drizzled with olive oil and grated with parmagiano. The texture and taste of the pasta combined with the proper ragu made me pledge after the first bite to put the pasta machine to use wherever and whenever possible. Sure it was a bit more effort but it was well worth it.
Patterns of 2016 - Week 4
Patterns and prints made in week 4 of 2016.

Red Eye

Sunch

Rinkel

Sparkle

Maxy
Pizza - Week 3 - Healthy Eating Fast/Food/Takeaway Alternatives

pizza ingredients
For week three of our Healthy Eating Fast Food/Takeaway Alternatives we made pizza at Sebright Children's Centre. The pizza session is always a favourite because everyone loves pizza. Each family made their own batch of dough which resulted in dough for two pizzas 20cm in diameter to decorate with different toppings of their choice. Lots of families took their second batch of dough home to share with their families.
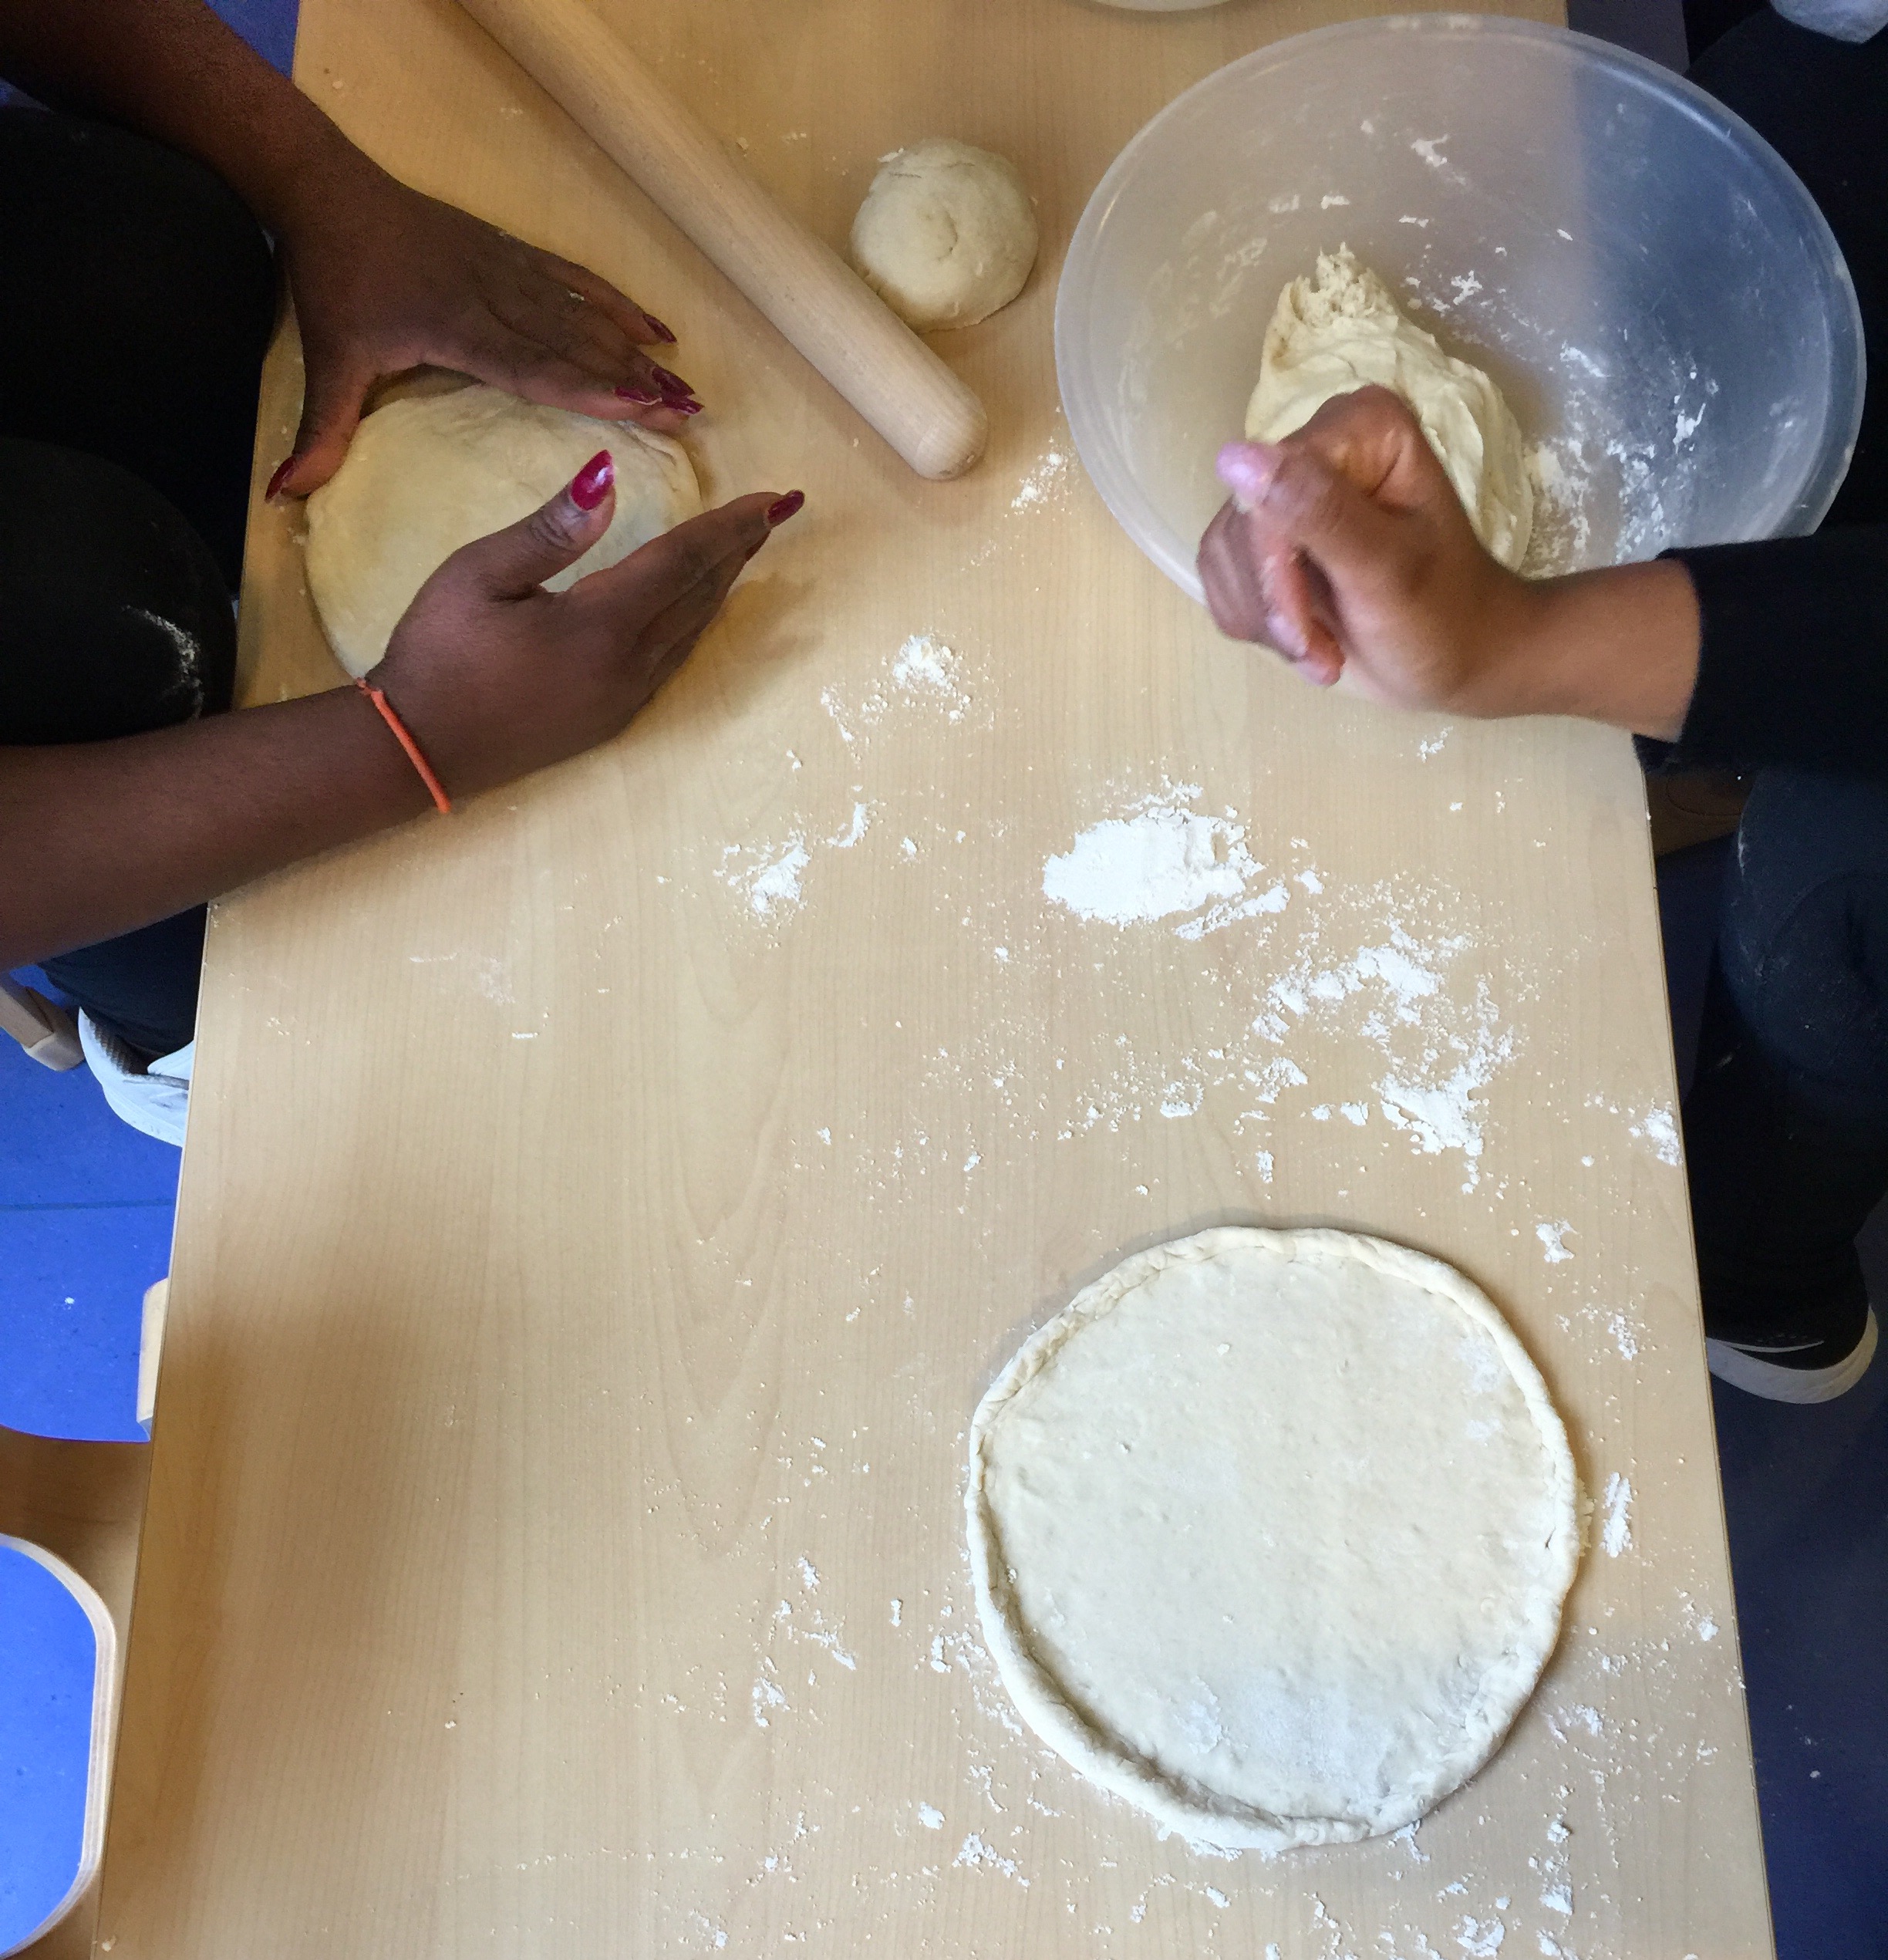
making and shaping pizza dough
Dough Ingredients
300g plain flour
250ml water
1 tablespoon olive oil
1 teaspoon baking yeast
1/4 tsp fine sea salt
1 tsp cornmeal (if desired)
several basil leaves or dried oregano (if desired)
Dough Instructions
- Preheat your oven to 200C.
- Sift all the dry ingredients in a bowl and mix thoroughly.
- Slowly stir in the water and olive oil. The dough should form a nice ball with all the ingredients mixed thoroughly and to not be too sticky or dry. If the dough is too sticky sprinkle a tablespoon of flour over the dough and mix in until the dough and add a teaspoon of water to the dough if it is too dry.
- Cover the dough and leave it to rest for 20 minutes.
- Uncover the ball of dough and place onto a sheet of, lightly floured surface, lightly rub a rolling pin with flour and starting in the middle of the ball roll the dough, turn and flip the dough until it is in the desired shape be it circle, square of even heart shaped.
- You want your dough to be roughly 3 cm thick on the bottom for a thin crust or 5 cm thick for a thicker crust. Do not roll it so thin that you can not lift the dough onto your baking sheet. When it is the desired shape transfer it to the baking sheet and you can sprinkle a teaspoon of cornmeal onto your baking tray before you place the dough on the tray for a bit of added texture to the crust.
- Slightly roll and turn up the edges to form the pizza edges.
- Add any ingredients that you may enjoy. (see below)
- Place in the pre-heated oven and cook for twenty minutes checking to make sure that it is cooked to your preference.
- Remove from the oven and allow to cool for a few minutes before slicing and serving.
Pizza Ingredients
Base - You can use passata as your tomato base or fresh tomatoes or even a bit of minced garlic and olive oil to create a non tomato based pizza or "white pizza".
Cheese - You can use any cheese of your choice including shredded mozzarella, fresh mozzarella, parmesan, gorgonzola, feta, etc
Toppings - You can put absolutely anything you would like on your pizza which is the great part of making your own. Ham, mushrooms, peppers, salami, tomatoes, sun dried tomatoes, artichoke, pineapple, etc.

perfect pizza
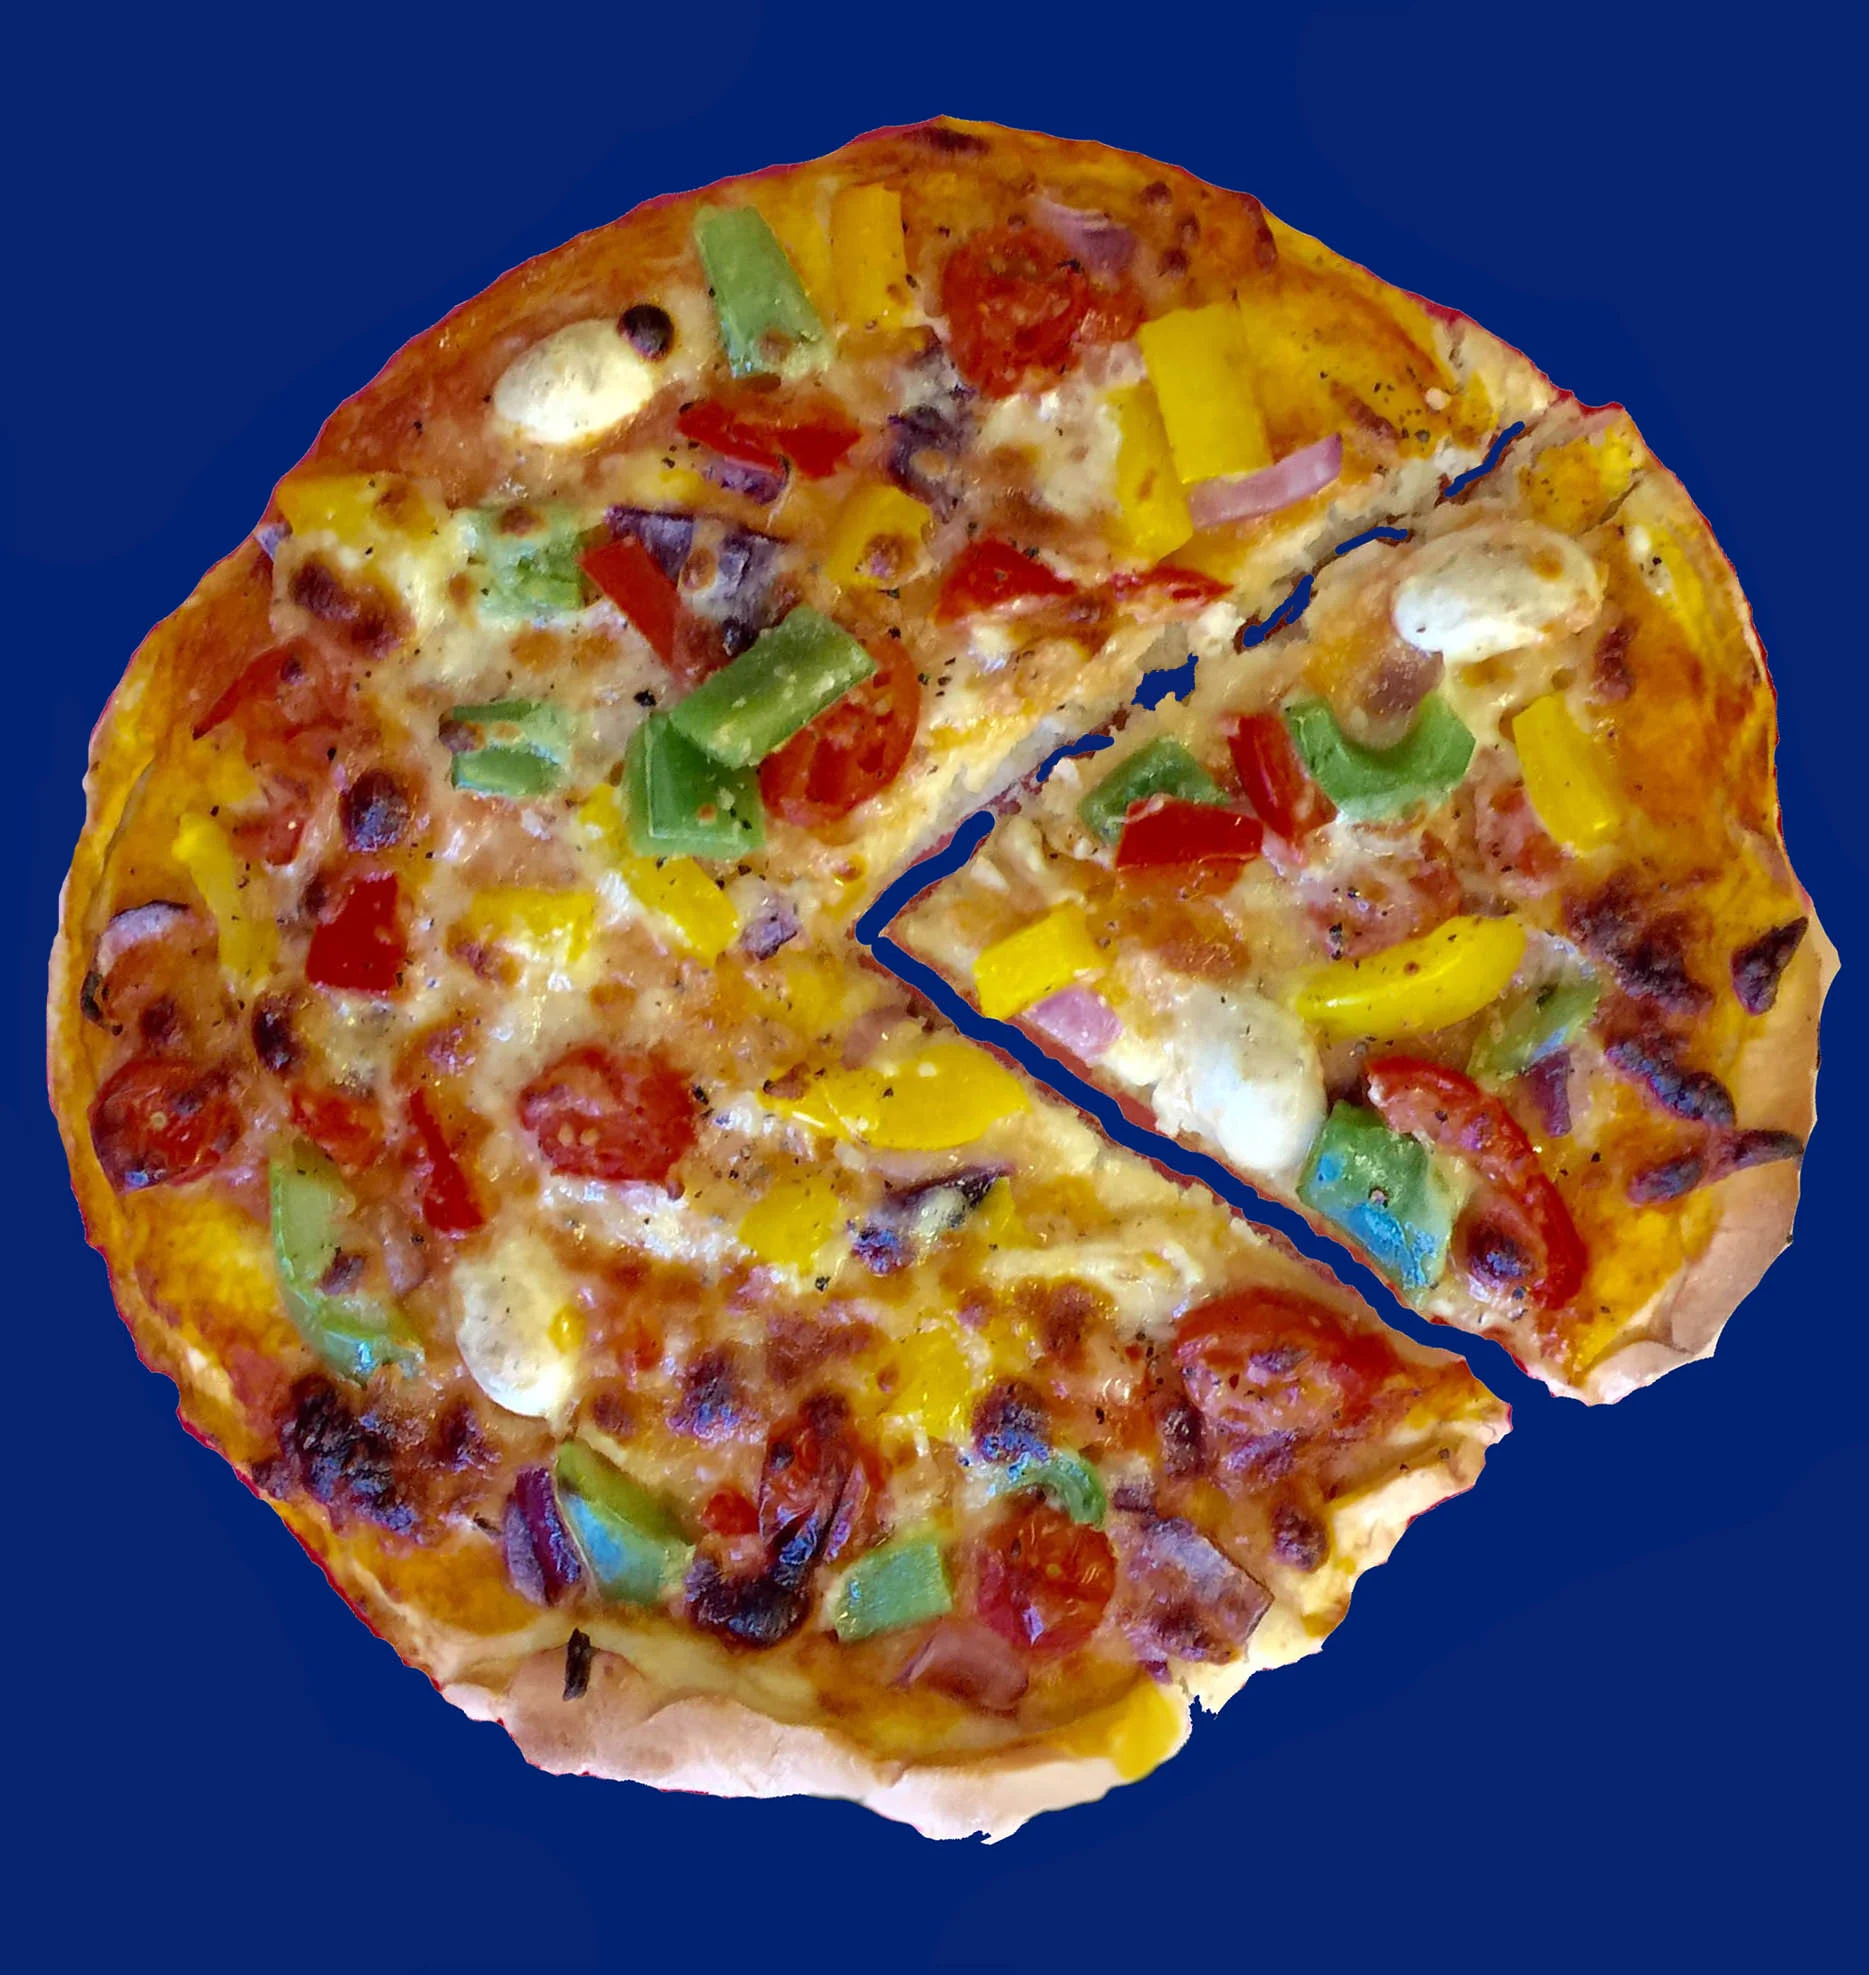
pac-man pizza

square shaped pizza

heart shaped pizza
Patterns of 2016 - Week 3
Here are the patterns from week 3 of 2016 created from polymer clay slices of canes that I have created over the past fifteen years, some are even earlier. The patterns are rebuilding my pattern database which will then be used for all sorts of different things.

Global Cell

Zen Monday

Space Cammo

Piral

Green Bolt

Bindo

Patchwork

LAS2
Curries - Wk 3 - Healthy Eating Fast Food/Takeaway Alternatives

For the third week of our six-week Healthy Eating Fast Food/Takeaway Alternatives course we made a vegetarian curry and a mango chutney. Each week we always have a vegetarian option but this week we opted to go all vegetarian. A combination of an overly large pan, an electric stove and baby tomatoes left this recipe rather dry and we were glad for our mango chutney that we had made but I have tweaked the recipe a bit or if you prefer a dryer curry you can omit the vegetable stock. I recommend getting the mango chutney made first and put to the side or do all the prep of the ingredients for both the vegetable curry and mango chutney and make then side by side. The vegetable curry can easily have meat, seafood or tofu added to it
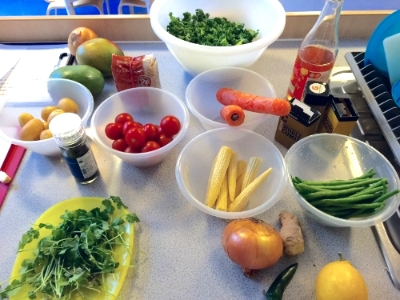
ingredients for vegetarian curry
Indian remains one of the most popular takeaway meals in the UK and in London we are spoilt with amazing Indian takeaway and restaurant options at all price points. Whilst working on Brick Lane I could not muster up the self control to not walk the twenty paces from where I worked to Ambala where I would eat three samosas a day as a late afternoon snack. I never even considered how many calories or grams of fat were in each samosa and when I researched this I was really surprised to see that I had been adding almost 500 extra calories and 25 grams of fat each day. I'm still unable to be near an Ambala and not get samosas but now I have it as a treat and limit myself to one meat and one veg samosa instead of my minimum three. Here are some more average amount of calories and grams of fat (respectively) in Indian takeaways:
Chicken Biryani - 1000 cal, 43 grams of fat
Chicken Korma - 860 cal, 50 grams of fat
Lamb Rogan Josh - 650 cal, 37 grams of fat
Vegetable Jalfrezi - 460 cal, 30 grams of fat
Garlic naan the whole naan - 760 cal, 25 grams of fat
Onion bhaji - 2 bahjis - 450 cal, 25 grams of fat
Poppadoms - 2 poppadom - 70 cal, 5 grams of fat
Meat or veg samosa - 1 samosa - 145 cal, 8 grams of fat
Indian Takeaway tips:
Many dishes are loaded with oil, ghee and fat and with pilau rice, starters and side dishes, Indian takeouts can quickly end up meeting and going beyond your daily recommended allowances and not is a healthy way at all.
Avoid the creamier based reamy curries like masala and korma which are higher in calories and fat. Tomato based curries like jalfrezi, rogan or madras are a better choice, or opt for dry dishes like biryanis. Some ways to make substitutions and save on calories include choosing plain boiled rather than pilau, chappati rather than naan, choosing veggie curries and opting out or reducing the number of fried starters such as samosas and bhajis.
Vegetable Curry Recipe
INGREDIENTS
500 g vegetables i.e.-cauliflower, green beans, carrots, aubergine
200 g potatoes, peeled and cut into 1 cm squares
6 tomatoes, chopped finely or a tin of tomatoes
2 onions - thinly sliced into crescents
300 ml vegetable stock
4 tbsp coconut oil, canola oil or alternative oil
2 cloves garlic - finely chopped or minced
1 tbsp fresh ginger root, peeled - finely chopped or minced
1 tsp cumin seeds - if you do not have cumin seeds you can use ground cumin
1 tsp ground coriander
1/4 tsp garam masala
1/4 tsp turmeric
1/4 tsp paprika
2 pinches of sea salt
1/4 tsp freshly ground pepper - or more if desired personal taste
Fresh coriander - washed handful, roughly chopped
Fresh lemon juice from half a lemon - strained to remove seeds
INSTRUCTIONS
- Prepare the vegetable stock by either warming homemade vegetable stock or use a high quality powdered stock that is free from additives or MSG.
- Toast the cumin seeds in a pan under medium heat while constantly stirring with a wooden spoon for 3 minutes making sure that the seeds do not burn. Grind the toasted cumin seeds and add all the readily ground spices into a small bowl ready to add later on in the recipe.
- Warm the oil in a large pan at medium heat and add the onions and cook slowly until transparent. Do not let them brown or dry out, add a spoonful of the vegetable stock should the onions start to dry out or brown.
- Add the ginger and garlic and cook for one minute, stirring all the while. Reduce the heat or add a spoonful of the stock should the garlic and ginger and start to brown, do let them burn.
- With the pan at medium heat, stir the ground spices into the onions, garlic and ginger and keep stirring until they are thoroughly mixed in, about three minutes.
- Now add the tomatoes and stock and keep stirring until everything is mixed together well, about 5 minutes.
- Add the vegetables and stir to mix throughout, cover and cook on low to mediumheat for 30 minutes or until vegetables potatoes are thoroughly cooked to desired texture. Stir in fresh lemon juice and fresh coriander, stir and serve with brown rice.
Quick Mango Chutney Recipe
INGREDIENTS
1 mango chopped into small irregular pieces
1/4 onion finely chopped or minced
1/2 - 1 chili - depending on personal taste - de-seeded and finely chopped
150 ml cider vinegar
100g sugar
1/2 tsp cumin
1/2 tsp coriander
pinch of salt
INSTRUCTIONS
- Combine the sugar and cider vinegar in a pan over medium heat until the sugar is dissolved.
- Add the mango pieces to the mixture and stir.
- Add the spices and salt and increase heat stirring all the while.
- Once the mixture has been boiling for 3-5 minutes, reduce the heat to low, stir occasionally to avoid burning and allow the chutney to thicken which should take 15 -30 minutes.
- Once the chutney is at the desired thickness remove it from the stove and place in a glass container.
- This is a quick chutney recipe that is meant to be served while fresh alongside a curry and eaten right away or kept for a few days wrapped up and kept in a fridge.
Melt and Pour Soap Making

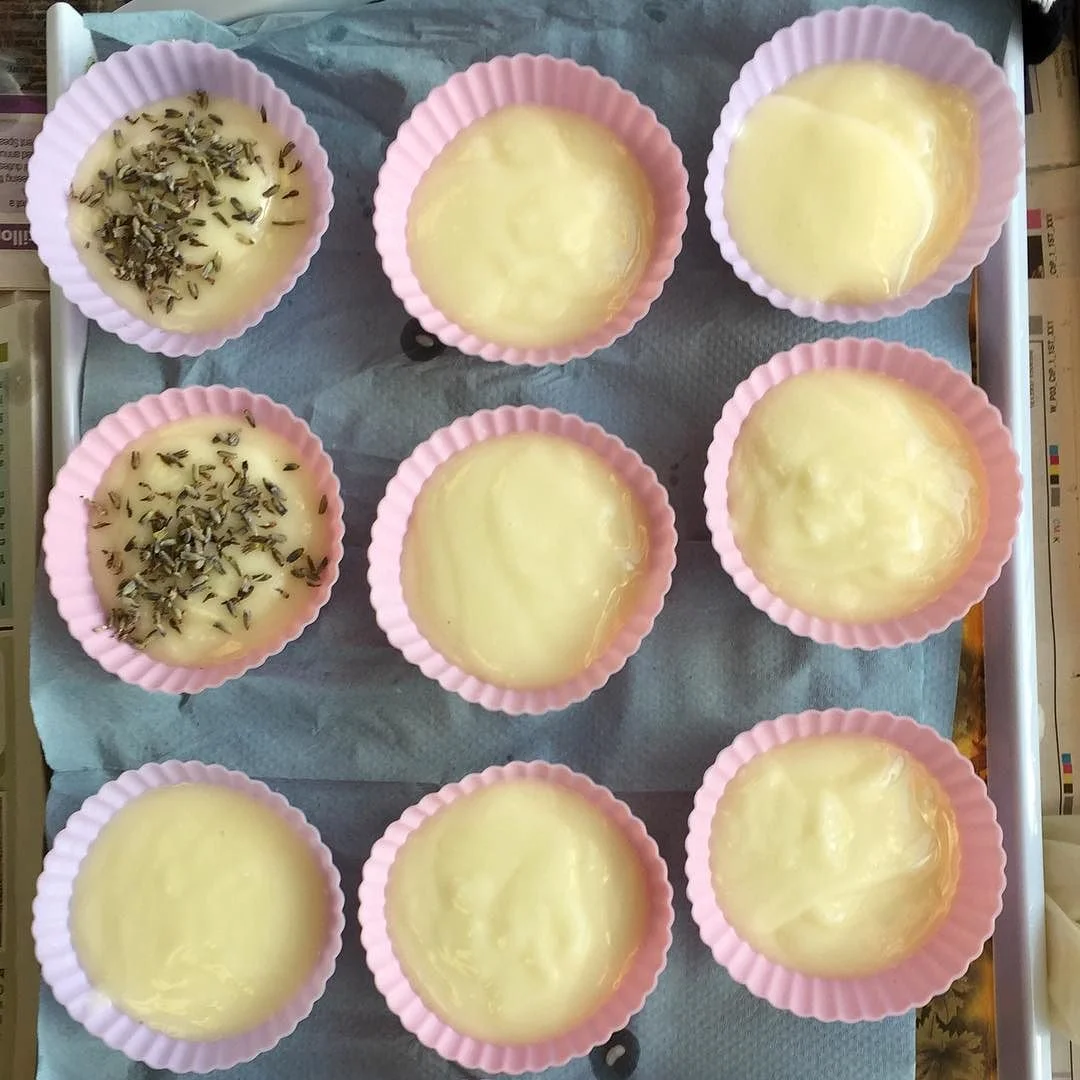
melt and pour butter soaps w/exfoliants

melt and pour butter soaps w/exfoliants

making our layered melt and pour loafs

the different layers of our melt and pour loaf soap

our resulting bars of layered soaps
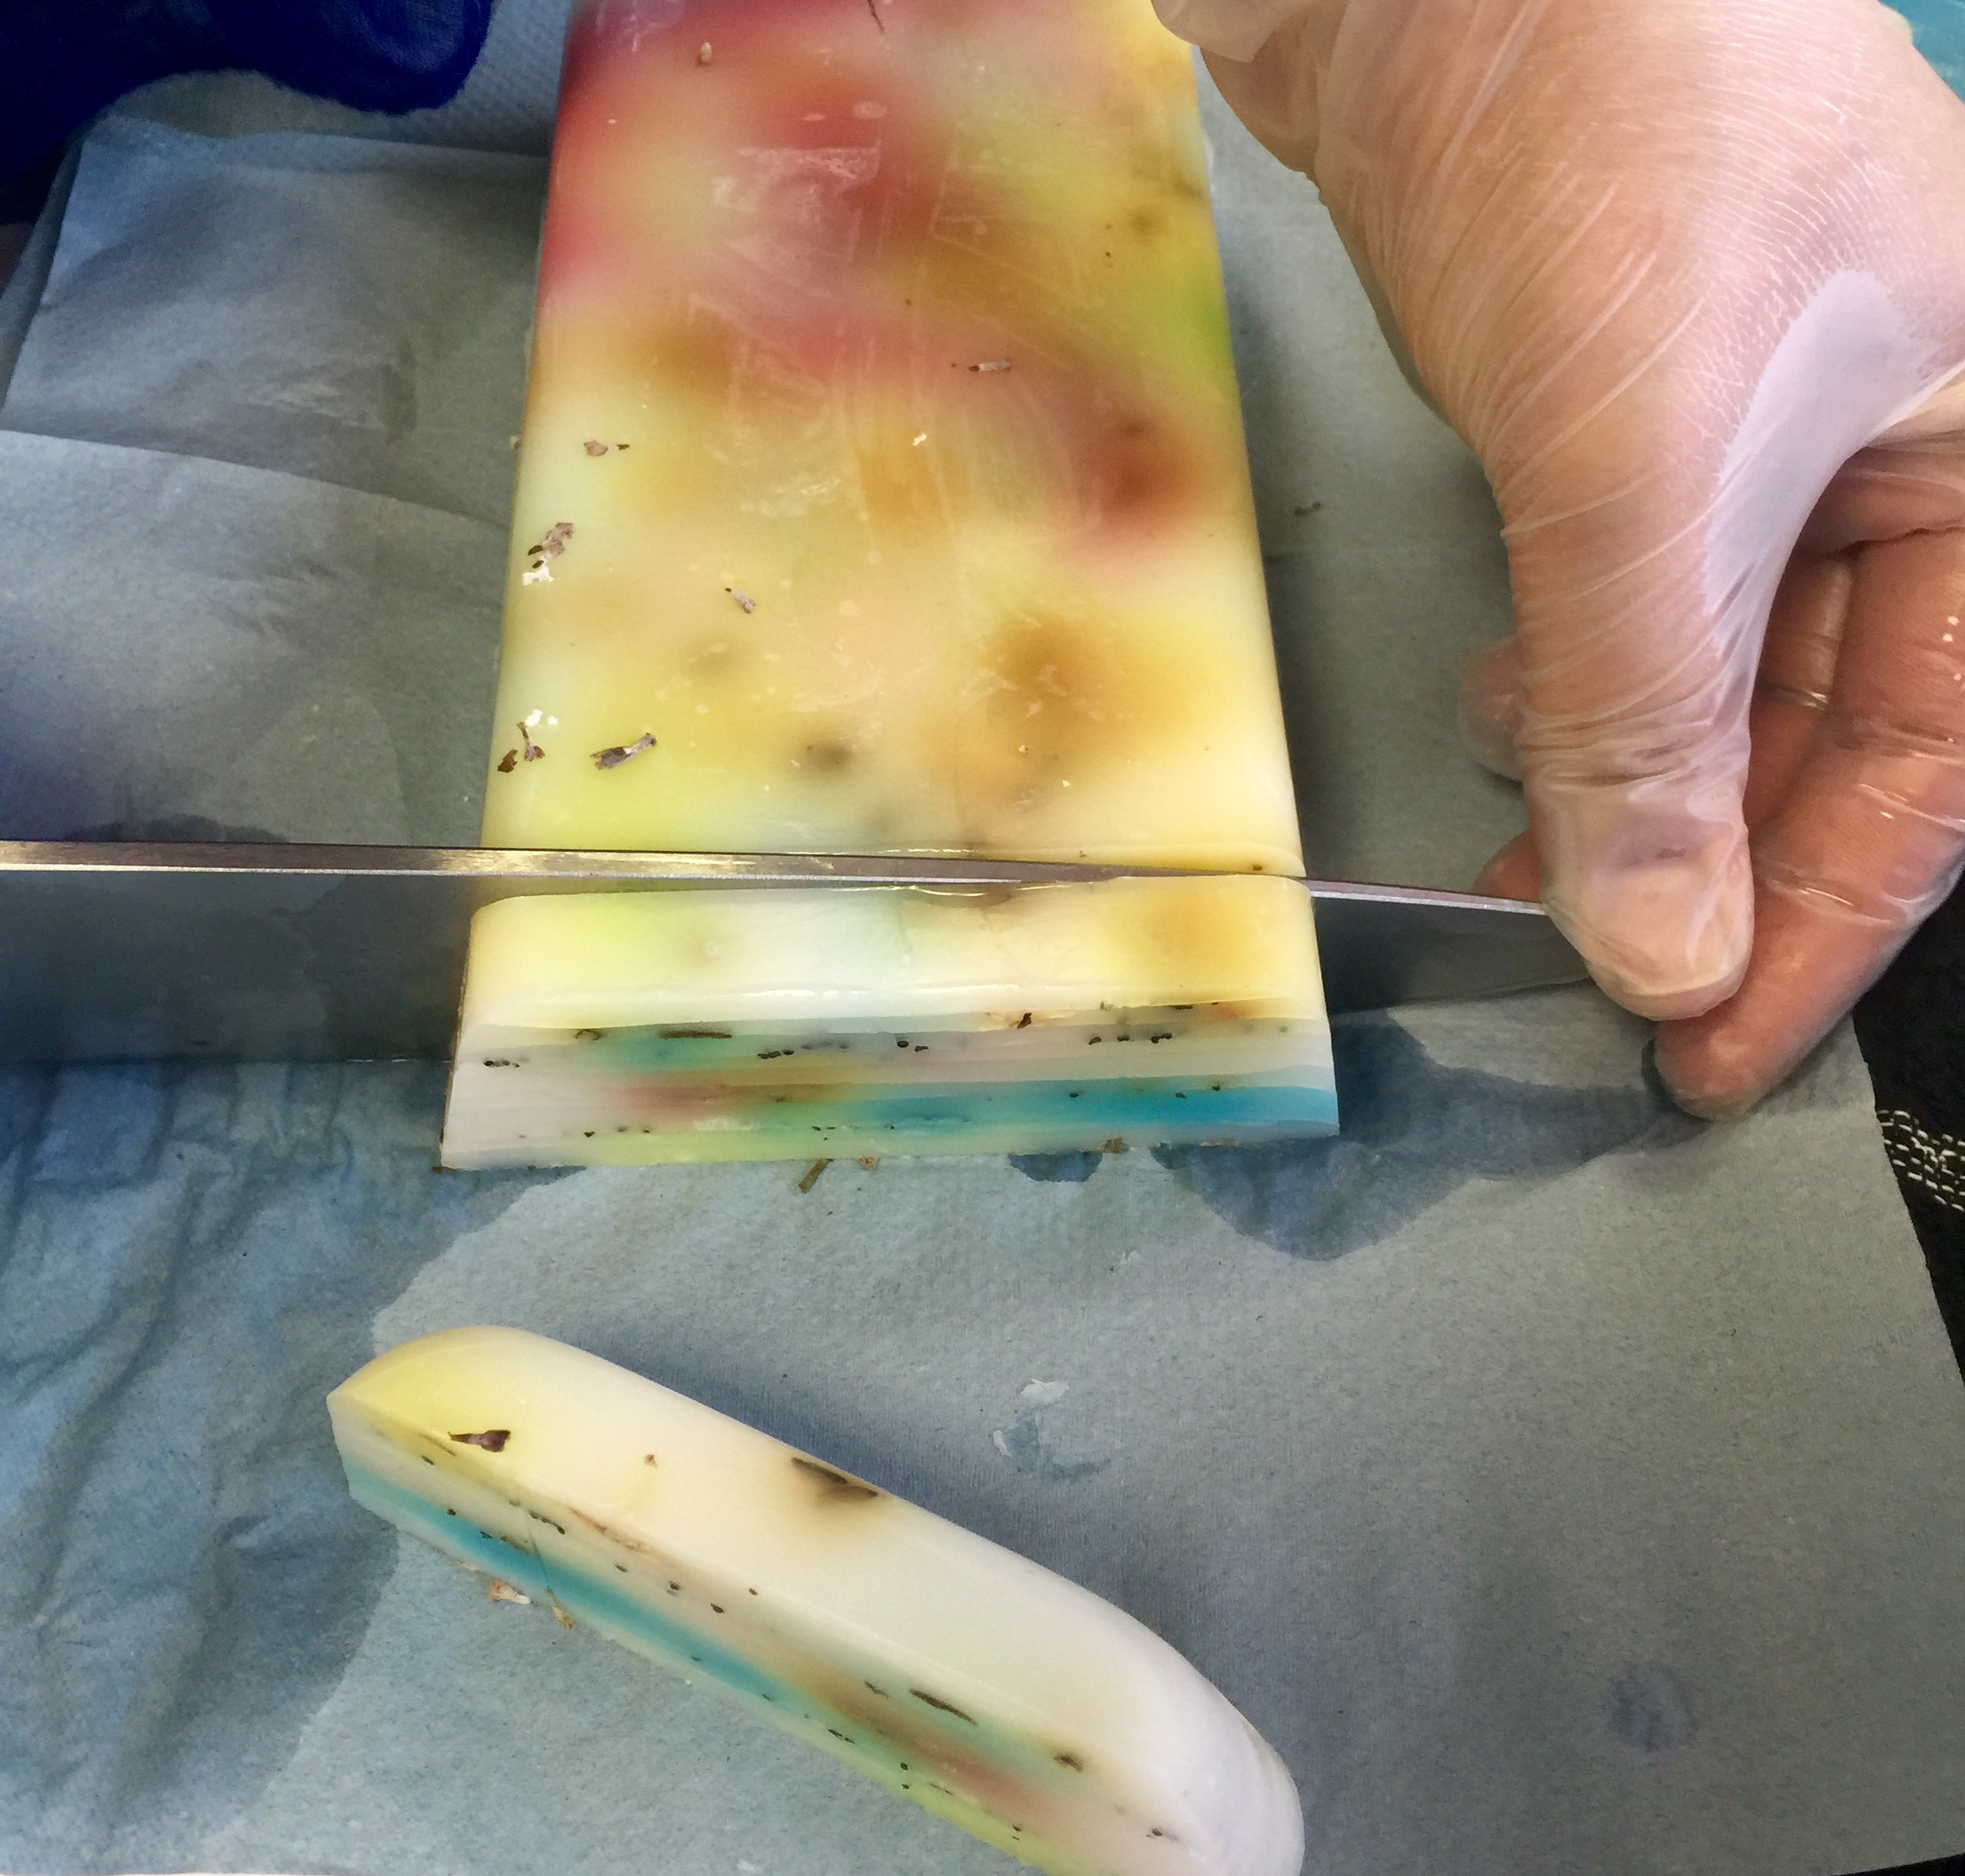
cutting the layered soap loaf
These are some of the soaps created by my students on a six-week soap making course I have been running at Wentworth Children's Centre in Hackney, London. We have spent two weeks on melt and pour techniques and worked with the children on decoration, colour mixing, scents and packaging. We are also a week of face and body scrubs, a week of bath fizzies/bath bombs and two weeks of cold press technique. The courses have been fun and well attended since everyone is interested in making their own products in order to know exactly what is in the products that we use every day. The students have been excited to learn all the techniques so they can practice them with their family and friends or perhaps even take up soap making as a hobby or making them as gifts or to sell.