White Chocolate Bread Pudding Recipe Revisited

The one recipe I have been asked for countless times is for White Chocolate Bread Pudding - WCBP. This is another New Orleans classic recipe and one that I picked up from my time living in the French Quarter (shout out Royal Cafe Krewe!). I love all manner of bread and butter puddings and this makes a delicious end to a Sunday roast dinner. You can make sweet, little fancy individual portions, portions for a few or big ol' trays of it to serve at parties. It is also ridiculously easy to make, inexpensive and most importantly, people love it! People love it so much that a friend of mine famously ate what has grown over time to six portions of it in one evening. He has requested this recipe so that he can make this with his wonderful daughters which makes me immeasurably happy - so I'm re-posting this for them. Scroll down a bit for my recipe and pics.

White Chocolate Bread Pudding recipe
Before we start - it's important to note that depending on the amount of bread used you may need to add a bit more milk and/or double cream at step 8 or if you are using bread from a larger loaf, a whole loaf or a bigger dish you can add an additional egg as well as chocolate, cream and milk. This is a great recipe to make your own and experiment with.

Ingredients


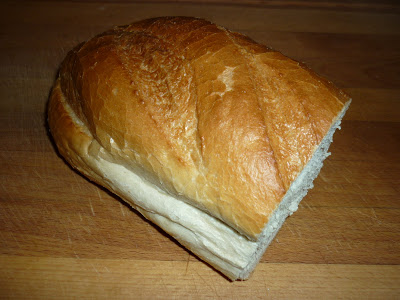
3/4 loaf of stale white bread or a whole baguette
250g good quality white chocolate - roughly 150g for the pudding, 100g for the sauce
250 ml whole milk
150 ml double cream - roughly 50ml for the pudding and 100ml for the sauce
50g caster sugar
two eggs
Butter
Strawberries in summer or sharp winter berries for garnish

wcbp bread.jpg
wcbp sliced.jpg
wcbp layer1.jpg
wcbp layer2.jpg
wcbp prebake.jpg
wcbp baked.jpg

Instructions

  1. Slice your bread in 2-3 cm slices. For this recipe I used a rectangular shallow dish, roughly 30cm x 20cm but any dish will do and depending on the size and shape of your bread slices you may want to test that your slices will fit your dish before the next step, cutting them into triangles or wedge them into place until you are happy that your bread and dish will work together and that the pudding will have at least two layers.
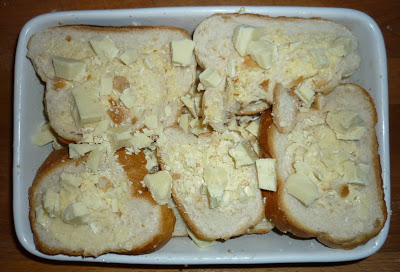
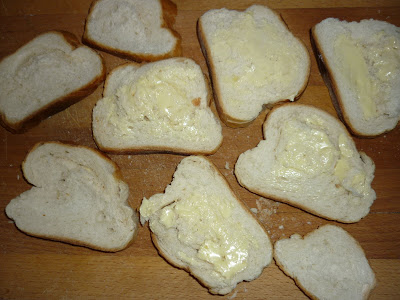
  2. Butter both sides of the bread. Use margarine if you must but I believe in butter.
  3. Arrange the slices in the dish trying not to leave any gaps.
  4. Scatter white chocolate in between each layer, one or two handfuls depending on personal preference, more if you want a more chocolate-y pudding or less for a pudding that is less sweet.
  5. Repeat until you have at least two layers.
  6. Top with a scattering of white chocolate.
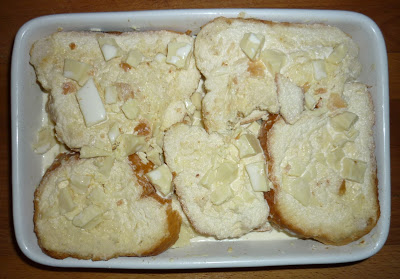
  7. Add the milk, double cream, caster sugar and eggs into a jug and whisk. This pudding is quite sweet and stodgy so if you don't like sweet puddings you can halve the sugar or even leave it out, I have tried this and it still works and there is also the sauce to go on top which will add sweetness.
  8. Pour the mixture all over the bread, making sure that the mixture hits corners and crusts. The mixture will fully saturate the bread and you want the mixture to come up at least halfway up the dish. Remember the note from above that depending on the bread you used you may need a bit more liquid or you may have a bit more than necessary. If you are a bit short on liquid just add a bit more over the top.
  9. Now put to side or refrigerate if you are not going to cook straight away, I always try to make it early, leave it covered in the fridge for a bit and let the liquid soak up.
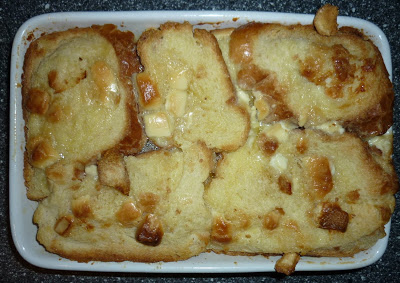
  10. Cook for 30 minutes at 200˚C or until browned, ideally you want it to be nice and stodgy with some crispier sections on top.
  11. Just before the pudding is done, take another 100 ml of double cream and melt the remaining half of the chocolate on the hob or in a microwave if you are pushed for time. Stir well or whisk until the tow are combined without overcooking or burning. IT will be the consistency of a runny custard.
  12. REMEMBER - If you are doing a massive WCBP just up the liquids, add another egg and use more chocolate.
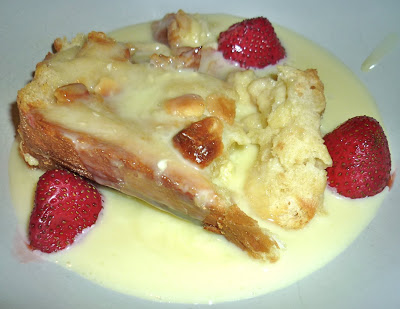
  13. Place portions of the WCBP in bowls and pour a nice amount of the hot mixture on top of the WCBP. I think the pudding is BEST when served with strawberries and I used some defrosted ones here as it's winter but winter berries work just as well to cut through the sweetness.
wcbp.jpg

Enjoy! This is a total crowdpleaser!!!

Quince/Apple & Polenta/Pistachio Crumble w/ Quince Ice Cream & Membrillo Shavings


Here is a re-experimentation created in an effort to make a slightly lighter crumble as well as to use lots of my quince preserves, in this case quince jam and membrillo. I always make the ice cream beforehand or the day before for one less step to complete on the day. If you don't have a jar of Smy Goodness or another type of quince jam you could make vanilla ice cream or serve with a good quality vanilla ice cream or frozen yoghurt. I had also made the membrillo about a month prior to this pudding but you could also buy ready made membrillo or omit it all together

CRUMBLE RECIPE
Ingredients

1 quince
2-3 apples
100g polenta
100g plain flour
100g butter, room temperature
70g sugar
handful of pistachios - finely chopped

Method

  1. Preheat the oven to 150°C.

  2. Lightly butter an ovenproof dish, I use one that is 15cm x 20cm. For a larger dish you may want to double the recipe.

  3. Peel, core, quarter and roughly chop the quince. Place the quince in an ovenproof dish top with 1 Tbsp of the sugar and shake to distribute and then place in the oven for 20 minutes. This will give the quince a head start as it requires a longer cooking time than the apple.

  4. Prepare the crumble topping by sifting the flour on to the top of the polenta. Add the sugar and chopped pistachios to the flour and polenta and stir well to mix.

  5. Add the butter and rub with clean fingertips to incorporate the butter throughout the dry ingredients until you have a crumbly texture that when pinched together will adhere to itself in clumps.

  6. Peel, core, quarter and roughly chop the apples into chunks.

  7. Remove the quince from the oven and immediately increase the heat to 180°C, add the apple to the quince and stir to distribute well. Be sure to use an oven glove and give the pan a shake so that the fruit levels out within the dish.

  8. Spoon the crumble topping on to the fruit until it has completely covered the fruit. Gently pat the crumble topping for a more compact topping.

  9. Return the dish to the oven and cook for 25-35 minutes or until the topping has gone golden brown. Remove from oven and allow the crumble to rest before serving.

QUINCE ICE CREAM RECIPE
Ingredients

200g milk
200g double cream
4 egg yolks
1 jar of Smy Goodness quince jam
vanilla seeds from half a vanilla bean or 1/2 tsp of organic vanilla extract
small pinch of salt

Method

  1. Place the milk and vanilla seeds into a pan. Turn the heat to medium but do not allow the milk to boil. Once the edges of the milk start to bubble remove it from the heat and allow it to cool.

  2. In a bowl or jug blend together the quince jam and egg yolks and salt.

  3. Once combined slowly stir in the double cream and beat until well combined.

  4. Now add the cooled down milk to the mixture and stir until completely blended.

  5. Add the mixture to an ice cream maker and follow directions. I have used a Gaggia and a Magimix

ASSEMBLY
S
erve a portion of the crumble on a plate or bow alongside a scoop of the ice cream and top the ice cream with very thin slices of membrillo.

Quince_o__Clock_I_turned_a_jug_of_extracted_quince_pectin_into_a_pattern.__pattern__quince__instafood__instaart__instafoodart__jugs.jpg

Above left are jars of quince jelly and a quince cordial that I made. On the right is a pattern/print that I made from a photo of extracted quince pectin in a jug.

Quince, freesias and the crumble and ice cream.


Smy Rhubarb Curd & Lemon Curd Tart

I'm all about experimenting when I cook and I love to find new ways to use my homemade chutneys, jellies and jams...and curds!  It's exciting times in the studio as I am sharing space with some interesting and creative people as seen in the above video - Aimee, Lucia and Sam.  I mentioned to one of said interesting people, Aimee, that I really fancied making...and eating...a rhubarb tart.  It wasn't until later on in the evening that I realised I didn't have enough butter to make the pastry.  I think I need to stop right now and say that this NEVER happens as I adore and believe in butter.  This is mainly as I've been taking a bit of a break since Christmas and I always have kilos of butter in the fridge to satisfy lemon curd orders.  Back to tonight's tart, I was feeling a bit lazy and couldn't face popping to the shops when it occurred to me that I had a half pound kilner jar of lemon curd in the fridge and that essentially there was a lot of butter in there.  So I decided to make an alternative pastry with lemon curd binding it together rather than butter.  For the pastry I used:

100g of rice flour

50g of plain flour

50g of strong brown flour

100ml of lemon curd

4tbsp of water

I blended them all together and left it to sit and rest in the fridge for about half an hour.

I then lightly dusted the pastry, board and rolling pin and rolled the pastry to about a half a centimetre in thickness and placed in on a dish that I had lightly dusted with rice flour.  I like using rice flour in pastries as I think it gives it a lighter texture.  I then lightly pressed the pastry into place and used a fork to flute the pastry.

I put about four tablespoons of lemon curd and spread this over the pastry.  I then took four tablespoons of Smy rhubarb curd and gently layered that on top of the lemon curd.  I then repeated another layer of about four tablespoons of lemon curd and arranged rhubarb segments in the curd layers.

Then I popped the tart into an oven that had been preheated to 180℃ for half-an-hour and then I left it to cool.

The tart was light and tangy and proved a perfect Friday afternoon treat for the studio.  Rhubarb season is just about to kick off and it's one of my favourite ingredients and you can expect rhubarb chutney, rhubarb curd and rhubarb and ginger jam to all be back in stock shortly.  You can also expect more tasting videos this year and lots of new and exciting flavours and recipes.

and remember...

it's not your chutney...

it's Smy Chutney.

please follow Smy Chutney on

facebook

and

twitter

...