Christmas Crafts and Cake Decorating at Comet Children's Centre

 
Homemade soaps

Homemade soaps

Christmas Cake made with homemade mincemeat

Christmas Cake made with homemade mincemeat

Sausage rolls

Sausage rolls

Gingerbread shapes

Gingerbread shapes


Thank you to all the families, staff and children at Comet Children's Centre - especially Gareth, Sarah Jane and Clara. We made our own mincemeat, mince pies, mince muffins, Christmas cakes, soaps, gingerbread shapes, carrot cake muffins, chocolate muffins, lots of icings and more.

Latitude 2016 - Action Aid UK Tent Workshops


Action Aid UK are an amazing charity and I was thrilled to be asked to be part of their Latitude Festival activities. The theme this year within their tent at the Festival was menstruation. There were mixed reactions when I discussed this with lots of people prior to the event; from mild interest, confusion and lots of pulled faces. It's something that all women will experience in their lives, a rite of passage, a cycle and the varied reactions reflect the different experiences that women will feel at different times. What we often do not think about are how people struggle with issues pertaining to menstruation in third world countries, while experiencing homelessness or poverty. The Action Aid Uk tent were offering activities including henna painting, dance and drumming workshops, my jewellery workshops and more.

My session focused on creating waist beads from recycled African glass beads:

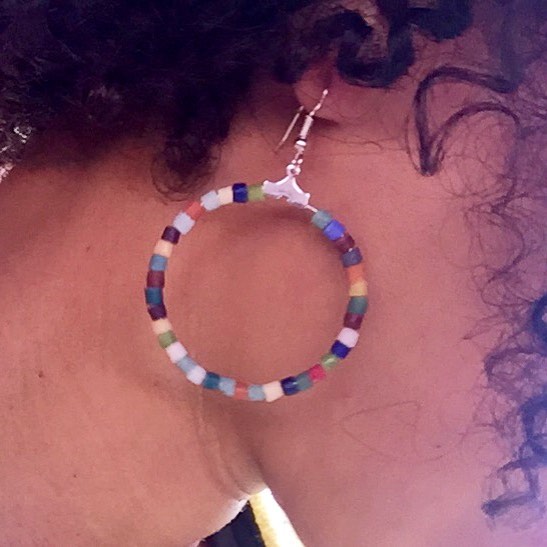
  • Waist beads are a celebration of womanhood and femininity.
  • Waist beads are not only for the young or slim!
  • Waist beads can also be worn around wrists or necks.

Waist beads can be traced throughout Africa, they are depicted in Egyptian hieroglyphics are famous from the Yoruba tribes of Nigeria. They are a chain of beads worn at the waist and have personal meaning to the wearer. Meanings include:
Adornment - worn under or over clothes or via an exposed mid-drift, waist beads are decorating our vital middle sections with one of a kind, personal pieces. It is not about conforming to body pressure but empowering this area and highlighting femininity.
Menstruation - Mothers may traditionally create and present their daughters with waist beads as a rite of passage into womanhood. Waist beads were/are practical as menstrual cloths could be strapped to the beads to provide a type of belt.
Celebration of Womanhood - waist beads are worn during rites of passage during puberty, at weddings. Waist beads are used as a tool to measure weight loss or gain as they will roll up or down which can also be used to signal a pregnancy. They are also said to allure partners and to signify that a young woman was ready for marriage.
Protection - as with lots of jewellery, waist beads are thought to offer healing energy to the wearer and protect them from negative energy. Gems and stones are included to provide specific powers.

Waist beads, like everything, can be seen negatively by some:
Ownership of Women - Some say that the placing of the waist beads at puberty can be seen as staking a claim on the woman’s virginity, purity and placing the father or parents in control.
Charms - Some waist beads have been known to be charmed or have spells placed upon them to entice or entrap the opposite sex.

African beads reflect the diversity of African geography, culture, resources, technology, religions and society. Beads have been found on or next to human remains dating as far back as 100,000 years ago, a number that gets larger with further archaeological finds. African beads have historically featured organic materials such as seeds, shells, bone, nuts but include those made from stone, shell, ceramic, glass, wood, bone, metals, plastic, computer chips and more. Today there is a growing industry of recycled glass and plastic beads.
Bead use and meanings range from decoration, trade, monetary, emulation, religion, adoration, fashion and more.   


_peace__latitude.jpg

Thank you so much to all the staff and volunteers of Action Aid UK and Latitude Festival!


Gazpacho at Wentworth Children's Centre


Everyone loves a soup during the winter months to get all ones nutrients and to keep warm. Gazpacho is a great way to enjoy soup in the summer and stay hydrated, refreshed and get much of ones five a day. Gazpacho is typically a Spanish dish with a recipe that will vary and depend on whom you ask and how their parents or grandparents made it. The following is a simple Gazpacho recipe that is simple and fun to make with children and suited to their taste buds.

GAZPACHO RECIPE
Ingredients

1 kilo red ripe tomato chopped
1 green pepper deseeded and chopped
1 red pepper deseeded and chopped
1 large cucumber deseeded and chopped
1/2 a small white onion chopped
1 garlic clove chopped
250 ml tomato juice
100ml extra virgin olive oil
2 tablespoons cider vinegar
1 chunk or two slices of stale (not moldy) bread
salt and freshly milled black pepper

Method

  1. Cover and soak the bread with the tomato juice and leave while preparing the other ingredients.
  2. Combine the tomato, green and red pepper, cucumber, garlic and toss in the olive oil.
  3. Remove the bread from the tomato juice and squeeze the excess juice from the bread and add the bread to the prepared vegetables.
  4. Blend everything together in a food processor or with a hand blender until smooth with no chunks.
  5. Now stir in the olive oil, cider vinegar and salt and pepper to taste.
  6. Chill for at least two hours and serve as is or with garnishes such as finely diced cucumber, herbs, ham, eggs, spring onions, peppers or anything you would like.
 

Salmon Pasta and Salad at Wentworth Children's Centre


Here are the salmon and brocolli pasta and accompanying beetroot salad that we made today at the Healthy Eating Course held at Wentworth Children's Centre. My workshops focus on healthy recipes that are easy to prepare and cost-effective. The workshops allow for the parents and children to prepare ingredients and cook together and try new things. We cook our meals and then sit down together to enjoy the fruits of everyone's labour.

SALMON PASTA
Ingredients

400g pasta (penne or fusili or tagliatelle)
250g skinless and boneless salmon fillets
250ml yoghurt
150 ml vegetable stock
150g broccoli - chopped very finely
25g butter
25g parmesan (optional)
1 chili finely chopped
1 lemon
bay leaf
Mixed herbs
Salt and freshly ground black pepper to taste

Method

  1. First poach the salmon. In a medium saucepan, add the vegetable stock, the juice of half a lemon, bay leaf, salt, pepper and heat to medium high. Add the salmon with the skin side next to the pan. Cover, reduce the heat and cook for 5 minutes or until cooked through. Once cooked remove from pan, cover and allow to cook. Keep the poaching liquid. Break the salmon up in to smaller flakes and remove any bones that may still be in the filets.
  2. Prepare the water for the pasta according to the instructions and be sure to add salt to the water. Set a timer and cook the pasta until al dente, strain and reserve.
  3. Melt the butter in the pan with the poaching liquid, add the chili to the poached water and stir over medium heat for one minute.
  4. Then add the brocolli, cover with a lid and cook on medium heat for three to five minutes.
  5. Next add the yoghurt to the mixture and stir well until everything is combined well.
  6. Add the parmesan to the mixture and combine.
  7. Add the mixture and the flaked salmon to the pasta, add salt and pepper then stir and thoroughly combine.
  8. Garnish with fresh parsley (or any fresh herb) and serve.

SALAD
Ingredients

Rocket
Beetroot
Cucumber
Radish
Tomato
1 tbsp Olive oil
fresh cracked pepper and a pinch of salt

Method

  1. Finely chop all the ingredients with the exception of the rocket and place in a bowl.
  2. Toss together with the olive oil, salt and pepper.
  3. Gently stir and fold the rocket into the vegetables.
 

Student Thank You Card


I love working with people of all ages doing arts, crafts and food workshops. I received this thank you card from a young girl who I have worked with several times before when she has attended workshops with her twin sister and their grandmother. Today we made mobiles and talked about art, crafts and musicals. I was really touched to receive this card at the end of the session and it hangs up and inspires me each and every day.


Mosaic - Henry Maynard Primary School

 
110 x 110 cm paper mosaic and acrylic paint on mdf

110 x 110 cm paper mosaic and acrylic paint on mdf

Here is the completed mosaic made over a four week period at Henry Maynard Primary School in Walthamstow London. Henry Maynard is a wonderful school where everyone from the children, staff and students are enthusiastic, kind, caring and proud of their lovely school. I facilitated a family learning course with eight children and their mothers. The children and parents came up with the theme of a ship, which is the schools emblem, coming out of a book and different items which symbolise what they love about their school such as music, reading, maths, friendship, sport and arts. The hand border are the mosaic hands that they all made from their own hands on the first day and symbolise the teamwork that they all showed throughout the project. I am so proud of everyone on the course and at the school and so thankful to everyone, especially Lauren and Alison Pearson. Please do check out my other mosaic projects at Wentworth Children's Centre and Comet Children's Centre.

Week 1 - making hand mosaic

Week 1 - making hand mosaic

Week 1 - cutting paper to size

Week 1 - cutting paper to size

Week 2 - making templates for mosaic pieces

Week 2 - making templates for mosaic pieces

Week 2 - painting the mdf board

Week 2 - painting the mdf board

Week 3 - filling in and laying out mosaic elements into place

Week 3 - filling in and laying out mosaic elements into place

Week 4 - gluing down the mosaic elements onto the board.

Week 4 - gluing down the mosaic elements onto the board.


Handmade Bath Bombs or Bath Fizzies


In our final six-week soap making course we made bath bombs or bath fizzies. We've all seen these in the shops or have received some as a gift and they are fun,give great results and are luckily easy to make. You can buy all the ingredients from most shops, chemists or online. To form the shapes of your bathbombs you can buy specific shapes online that will create round ones or use silicone moulds, recyclable items like little yoghurt pots or go to the pound shop and buy a muffin tray which is what I have used for this class.

Dry Ingredients
250g bicarbonate of soda
75g epsom salts or mineral salt
75g citric acid
50g cornstarch

Wet Ingredients
2 tsp oil
1/2 tsp water
4 drops essential oil/fragrance
1-2 drops food colouring/beauty grade colourings

Bath Bombs/Bath Fizzies Instructions

  1. Lightly grease your moulds, trays or containers with any oil.
  2. Mix all the dry ingredients together in a bowl, make sure there are no lumps at all, use a whisk or a spatula to make sure there are no lumps.
  3. Combine all your wet ingredients together in a separate container and thoroughly mix.
  4. In stages, add a little bit of the wet ingredients to the dry ingredients, stirring all the time, until both are combined. You might hear a bit of fizzing which is normal, you just need to keep stirring.
  5. .Your mixture will start to appear a bit damp and clumpy and you can test if it’s ready by balling some together in your hand. You want the mixture to hold it’s shape and not crumble. If it is crumbling and you have added all your colour mixture you can give your mixture a spray of water and them stir again until it holds together in your hands. Don't be tempted to add lots of water as this will make the mixture expand.
  6. When the mixture is ready you can add it to your moulds, trays or containers. Make sure to pack it in tightly to the mould, tray or container or the mixture will crumble and not hold its shape.
  7. Leave the moulds or trays for at least an hour and then remove. f using silicone moulds, leave your bath fizzies in over night and then take them out of the moulds.
  8. When packaging or storing your bath fizzies make sure that they are not kept in an air tight container or they will expand or explode. Keep them in a baggie or paper bag or box until ready to be used.


Burger & Veggie Burgers - Wk 6 - Healthy Eating Fast FoodTakeaway Alternatives

 
ingredients for the burgers and sweet potato chips

ingredients for the burgers and sweet potato chips

A burger and chips may be the poster child of the fast food world. Everyone loves burgers and chips in some fashion at one time or another. With McDonald's being so prevalent all over the world burgers and chips have buried themselves into our subconscious so that when we may need something cheap and/or quick and/or naughty they will pop into our minds as an option and/or craving. Burgers range in quality and price and variety and we may be tricked into thinking that a veggie burger is always a healthier option than a meat burger however just like their meaty cousins, veggie burgers range in quality and cost as well.

For this session we handmade our own veggie burgers and meat burgers and opted for a healthier sweet potato chip. What is great about making your own burgers is that you know exactly what is going in to them and you can adapt the recipe to suit your own tastes and preferences. The veggie burgers are made with butter beans but any pulse can be added. Both burgers can be made in advance and frozen which comes in handy for those times when you may not know what to cook or lack inspiration. When freezing the veggie bean burgers you want to freeze them before the flour, egg and breadcrumb stage and save that stage for after they are defrosted. I was guilty of whining to my mother when she made homemade burgers that, "They don't taste the same." I was right but they didn't taste the same because they tasted better and by getting everyone involved in preparing the salad, helping to shape the burgers, offering different toppings and seeing who can build the best burger - a homemade burgers and chips night can be a fun evening for family and friends.

creating the butter bean burgers

creating the butter bean burgers

butter bean burgers

butter bean burgers

Butter Bean Burger Ingredients:
400g can butter beans (*or any pulse) - drained, rinsed and shells removed
30g fresh mozzarella chopped (*or substitute a cheese of your choice)
30g parmesan grated (*or substitute a cheese of your choice)
4 tbsp coconut oil (* or substitute olive oil)
1/2 onion, finely chopped
1 garlic clove, crushed
1 Tbsp sesame seeds
1/2 tsp ground cumin
1/2 tsp ground coriander
1/2 tsp chili powder
handful of chopped parsley
3 tbsp plain flour
1 egg beaten
75g fresh white breadcrumbs
fine sea salt and freshly ground pepper to taste

* use a cheese of your choice or substitute 60 grams of left over mashed potato

Butter Bean Burger Instructions

  1. Use a fork to mash up the beans in a bowl and set aside.
  2. Gently heat the coconut oil in a pan and add the onion and garlic. Cook over a low heat for 4-6 mins, until softened.
  3. Add the onion and garlic mixture into the butter beans and stir.
  4. Add the cheeses, sesame seeds, cumin, coriander, chili and parsley. Shape the mixture into burgers of your desired size, cover and chili for 20 mins.
  5. Set up three plates; one for the flour, one for the beaten egg and one for the breadcrumbs.
  6. Roll each burger in the flour, then the egg and then the breadcrumbs - making sure the burger is coated all over at each stage.
  7. Heat the remaining 2 Tbsp of coconut oil to medium in a non-stick frying pan and add burgers. Cook for 5-7 minutes on each side until golden brown.
  8. Place on a piece of kitchen paper to remove excess oil and serve on their own or with pita bread, rolls or salad.
shaping the beef burgers

shaping the beef burgers

beef burgers and sweet potato chips

beef burgers and sweet potato chips

Beef Burger Ingredients
500g pack extra-lean beef mince
100g fine breadcrumbs
1 onion, minced
3 cloves of garlic minced
1 Tbsp coconut oil
1 Tbsp dijon mustard
1 Tbsp tomato paste
1/2 tsp onion powder
1/2 tsp mixed dried herbs
1/4 tsp chili powder
1/4 tsp sea salt
1/4 tsp freshly cracked black pepper

Beef Burger Instructions

  1. Add all the ingredients in a large bowl and thoroughly mix.
  2. With clean hands shape the mixture into burgers of your desired size and thickness. Place in a single layer on a plate, cover with plastic wrap and put in the fridge for 15 minutes.
  3. Heat 1 Tbsp of coconut oil on a non-stick frying pan and cook for 4-8 minutes on each side until cooked as desired.
  4. Place on a piece of kitchen paper to rest and remove excess oil and serve on their own or with pita bread, rolls or salad.
sweet potato chips

sweet potato chips

blackened sweet potato chips

blackened sweet potato chips

Blackened Sweet Potato Chips Ingredients*
4 medium sweet potatoes, cut into chips size and width of a pinkie finger
1 Tbsp coconut oil
pinch smoked paprika
pinch chilli flakes
pinch ground cumin
pinch ground coriander
pinch onion salt
pinch garlic salt
pinch cayenne pepper
pinch black pepper
pinch oregano
pinch thyme
pinch of freshly ground black pepper
* omit or add ingredients as desired or available

Blackened Sweet Potato Chips Instructions

  1. Preheat the oven to 220°C/200°C if it's fan assisted.
  2. Cut sweet potatoes into chips roughly the size and width of a pinkie finger.
  3. Add all the dry ingredients and the coconut oil into a bowl and mix together thoroughly.
  4. Add the sweet potato chips to the bowl and mix thoroughly so that the oil and seasoning are dispersed all over the chips.
  5. Place onto two baking trays so that the chips are in a single layer.
  6. Place into a preheated oven and cook for half an hour, turning at the midway point and making sure that they do not burn.
 
our feast of beef burgers, butter bean burgers and blackened sweet potato chips with tomato salad

our feast of beef burgers, butter bean burgers and blackened sweet potato chips with tomato salad


Cold Process Soap Making


I've been teaching a six-week Soap Making Course at Wentworth Children's Centre and for weeks 4 and 5 we have been learning the cold press (CP) technique. We could have easily spent the whole six weeks on the CP technique but since part of the course has been family learning and we involved the children of the families there in the activities where it was appropriate for them to do so.

CP equipment (pic from @Wentworth_CC)

CP equipment (pic from @Wentworth_CC)

We had been building up to this session and this was our most technical as well as creative which explains our scales, goggles and gloves. For the first of the CP technique weeks we used the following recipe which I calculated using the fabulous SoapCalc.net:

150g distilled water (or filtered water, then boiled and cooled)
60g lye
160g olive oil
160g coconut oil
40g almond oil
40g castor oil
10 g lavender essential oil


Blending the oils and lye mixes

Blending the oils and lye mixes

Achieving trace

Achieving trace

The saponified soap poured into moulds

The saponified soap poured into moulds

The soaps after 1 week

The soaps after 1 week

Soaps from week 2 with yellow and green dyes

Soaps from week 2 with yellow and green dyes

me with some of our group from the class (pic from @Wentworth_CC)

me with some of our group from the class (pic from @Wentworth_CC)


Turkish Food - Wk 5 - Healthy Eating Fast Food/Takeaway Options

 
ingredients for the Turkish feast

ingredients for the Turkish feast

For week 5 of the Healthy Eating Fast Food Alternatives course we prepared a Turkish feast at Sebright Children's Centre. Each time I run this course the fifth week's menu is chosen by the students. Turkish food is very healthy and very varied but like any food eaten at restaurants it can be full of extra calories and fat. A special thanks is due to Selma who is Turkish and works at Sebright and another very kind Turkish woman who attended the course with her daughters. Together they helped us tweak the recipes and gave us lots of tips. Selma noted that Turkish food often involves a lot of preparation and different stages so we chose these recipes that can be prepared in advance, are cost effective and served with healthy sauces and sides. Selma and Itidal and all the staff at Sebright have been so helpful to myself and the families on the course and they make working at Sebright such a pleasure and I am very thankful for their hard work and support.

For our feast we prepared falafel, lamb kofte, hummous, vegetable cous cous, salad and a homemade mint dressing served with pita bread for 8 adults and 5 children for £15 in two hours.

resting uncooked falafel

resting uncooked falafel

cooked falafel

cooked falafel

Falafel Recipe

400g can chickpea, rinsed and drained
Half a red onion, finely chopped
garlic clove, chopped
handful of fresh parsley
handful of fresh coriander
2 tbsp breadcrumbs
1 tsp paprika
1 tsp ground cumin  
1 tsp ground coriander
1⁄2 tsp chilli powder
2 tbsp plain flour
2 tbsp canola oil or coconut oil
toasted pitta bread
lettuce, tomato and various accompaniments as desired

Falafel Instructions

  1. Rinse the chickpeas and soak them in water and lightly rub the chickpeas with your finger and thumb to remove the shell surrounding each chickpea and then discard shells.
  2. Blend all the ingredients until they are a smooth consistency. Cover with plastic wrap and allow the mixture to rest for 20-45 minutes, if not longer.
  3. Heat up your oil to medium hot but be careful to not burn the oil.
  4. Shape the mixture into golf sized ball shapes and gently flatten a bit using wet hands so that the mixture does not stick to your hands. Place the balls ready to fry on a plate.
  5. Fry the falafel balls until they go a deep brown in colour, turn carefully and cook the other side. When they are ready remove and place on a sheet of kitchen towel for a few moments to soap up any excess oil.
  6. Serve in pita bread or on their own with tomato, lettuce, hummus and other dips and gerkhins, pickled cabbage or other accompaniments.
uncooked kofte

uncooked kofte

grilled kofte

grilled kofte

Lamb Kofte Recipe

Ingredients
1 garlic clove, crushed
2 tbsp chopped mint
500g lean lamb mince
1 small red onion finely chopped
1/4 green pepper, cored, deseeded and finely chopped
salt and freshly ground black pepper

Lamb Kofte Instructions

  1. Mix together the garlic and mint in a bowl, add the lamb and stir well. Cover and leave to marinate in a cool place or the fridge for 10 minutes.
  2. Shape the mixture into 5 cm long sausage shapes or 3 cm wide round disc shapes and leave to rest covered in a cool place or fridge for 10 minutes.
  3. Preheat the grill to a hot setting.
  4. Place the shaped lamb kofte in a single layer on a baking tray and place on the top shelf and cook for 10 minutes, after 10 minutes turn each kofte and cook for another 10 minutes being sure to not burn. Alternatively you can grill the kofte as well for 4-5 minutes on each side until cooked through.
  5. Serve with mint dressing, cous cous, salad, hummous,e tc.
 
homemade humous

homemade humous


Hummous Recipe

Ingredients

Two tins (425 grams) chickpeas
Fresh lemon juice, about 1 large lemon
60ml tahini
3 tablespoons olive oil, plus more for serving
1 garlic clove, pressed or finely minced
2 to 3 tablespoons water
1/2 to 1 teaspoon salt, depending on taste
1/2 teaspoon ground cumin

Dash of ground paprika for serving if desired
A sprig of fresh coriander for serving if desired

Hummous Instructions

  1. Open the tin of chickpeas, drain the liquid and then rinse well with water. Soak the chickpeas in some water and using your fingers and thumb to lightly rub the chickpeas which will release the shells from the chickpea. When all the shells are removed strain the water and keep the chickpeas to the side for the moment.
  2. In a separate bowl or blender add tahini, lemon juice and the olive oil to a bowl or blender and mix until thoroughly combined. Make sure to scrape the sides down into the mixture and blend/mix again.
  3. Add the garlic, cumin and salt to the mixture and blend for one minute. Make sure to scrape the sides down into the mixture and blend until thoroughly combined.
  4. Add the chickpeas in stages to the mixture and blend until combined. Keep blending until the humous is thick and smooth.
  5. Taste the humous and add any more ingredients until it is of a desired taste and consistency. If the mixture is still not a smooth enough consistency you can add another tablespoon of olive oil or water and then blend again for 1 minute.
  6. Place the humous into a decorative serving bowl or plate and then garnish with a tablespoon of olive oil, sprinkle with paprika and garnish with a sprig of coriander.

Homemade hummous will last for one week in an airtight container in the fridge.

You can add all sorts of things to hummous to jazz it up, for example roasted garlic, roasted red peppers, chillies and more. You can also use any sort of pulses such as butter beans to make a slightly different type of dip.

If you like a very smooth consistency of hummous you can remove the shells before adding it to the mixture.

For an even more inexpensive hummous you can use dried chickpeas which are cheaper. For this you should soak the chickpeas in water overnight and then cook gently for an hour the next day until soft.

tasty side salad

tasty side salad

vegetable cous cous

vegetable cous cous

Vegetable Cous Cous Recipe

Ingredients
500g cous cous
500g organic vegetable stock or one free of MSG or additives
100g tomato diced small
half a red pepper diced small
half a green pepper diced small
half a yellow pepper diced small
handful of fresh parsley
pinch of salt
pinch of freshly cracked pepper

Vegetable Cous Cous Instructions

  1. Place the couscous in a heatproof bowl, pour 500ml/18fl oz of vegetable stock over the couscous. Leave to stand until the liquid has been absorbed. Season with salt and pepper and fluff the couscous with a fork. Set aside until all the liquid is absorbed, about 15-20 minutes.
  2. Add all the remaining ingredient and stir until combined. Any diced vegetables can be added to make a tasty cous cous salad.
  3. Transfer to a serving bowl and garnish with some larger slices of vegetables like peppers or tomatoes and serve.

Basic Mint Dressing
Ingredients
one bunch of mint
1/4 tsp fine sea salt
4 tbsp boiling water
4 tbsp cider vinegar
1 level tbsp sugar or agave syrup

Basic Mint Dressing Instructions

  1. Separate the stems from the mint leaves and discard the stems.
  2. Gently rub the salt into the mint leaves sprinkle and chop into roughly .5-1 cm pieces.
  3. Add the leaves to a heatproof bowl then stir in the sugar or agave syrup.
  4. Top the mint with the freshly boiled water while stirring thoroughly and then leave to cool.
  5. Once the mixture is cool, stir in the cider vinegar.
  6. Add more water or vinegar and adjust seasoning to suit your taste.

The dressing can be added to vegetables, salads, meat and fish.

sitting down to enjoy our meal

sitting down to enjoy our meal